Configuring Solve
The solve feature allows administrators to provide quick access to agents to portals or other external resources from the reply pane. This feature is available for the following types of activities:
-
CallTrack
-
Social
-
Email (both composed and inbound)
-
Chat and Video chat
For composed emails, agents first associate the composed activity with a queue and then go on to use the solve feature configured for that queue. To enable this feature, administrators must configure the department level setting: Allow agents to associate a new outbound activity with a queue.
Solve can be configured to use knowledge bases that have been authored and configured in the same system as the queue.
Configuring Solve to use a Local Knowledge Base
To configure the Solve button to use a local knowledge base:
-
From the Navigation menu, browse to Business Rules > Queues.
-
On the List page, select a queue.
-
On the Properties page, on the General tab, click the Add
 button in the Configure Solve field.
 -
Select the tab pertaining to the types of activities to which you want to configure Solve.
-
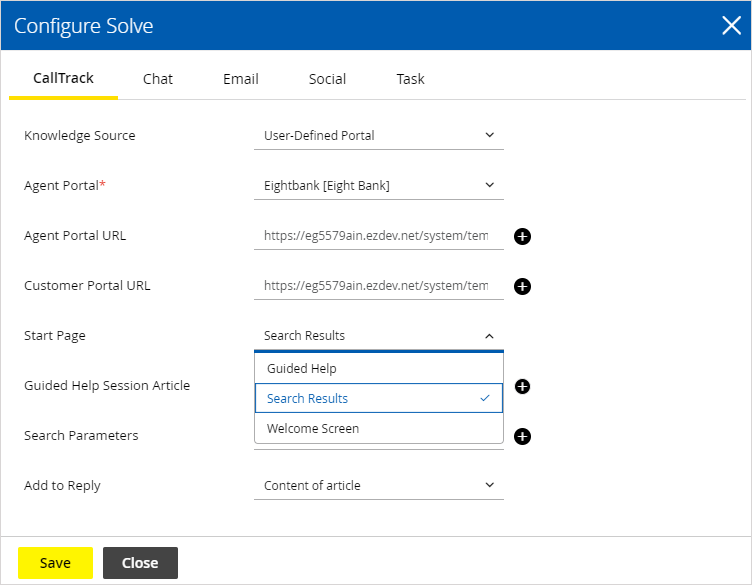
In the Knowledge Source dropdown under the selected tab, select User-Defined Portal, Default Portal, or External URL and provide the following information:
-
User-Defined Portal: Select this option to provide access to one of the self-service portals configured in the department. Agents who have the KnowledgeAgent (for basic self-service portal) or KnowledgeAgent Advanced (for Guided Help) licenses will have access to this link.
-
-
Agent Portal: From the dropdown list, select the portal.
-
Agent Portal URL: The portal URL is populated upon selecting a portal. You can edit the URL by clicking the Add
 button. If you are using custom templates for the portal, make sure you edit the link before adding it here. For details, see eGain Knowledge Manager's Guide to Portals.
 -
Customer Portal URL: The portal URL is populated upon selecting a portal. You can edit the URL by clicking the Add
 button. The portal must be enabled for customer access for external users to view the portal. This is configured in the Knowledge Console. For more information, see the eGain Knowledge Manager's Guide to Portals.
-
-
-
Start page: Set the start page as:
-
-
Guided Help: Takes the agent to the Guided Help section of the portal, The agent can select from the list of case bases. If there is only one case base available to the agent, he is taken directly to the first question of the case base. If the agent does not have the KnowledgeAgent Advanced license, the case bases are not displayed and the agent is taken to the home page of the portal.
-
Search Results: When the agent clicks the Solve button, a search is run using the parameters set in the next field, and the search results page is displayed.
-
Welcome Screen: This takes the agent to the home page of the portal.

-
-
Guided Help Session Article: If Guided Help is selected as the start page, click the Add
 button. In the window that appears, navigate through the topic list to locate the desired guided help session article. When you've made your selection, click Okay.
 -
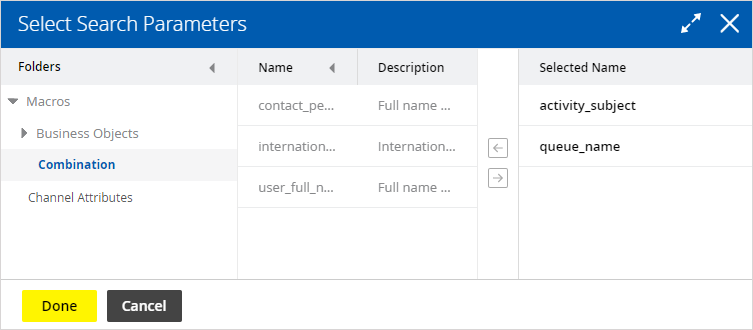
Search Parameters: If Search Results is selected as the start page, click the Add
 button. In the Select Search Parameters window, select from the macros configured in the system. You can select multiple macros. When the Solve button is clicked, a search is run using the text of the macros selected, and the search results page is displayed.
-
Add to Reply: From the dropdown list select if you want to send a link of the article to the customer or if you want to send the content of the article.
-
-
Default Portal: Select this option to make the solve option for the channel the default portal of the department. The Agent portal field cannot be changed. All other fields can be adjusted accordingly. When a department is created, the master portal is the first default portal. If other portals have been created, the portal assigned as the default portal appears here.
-
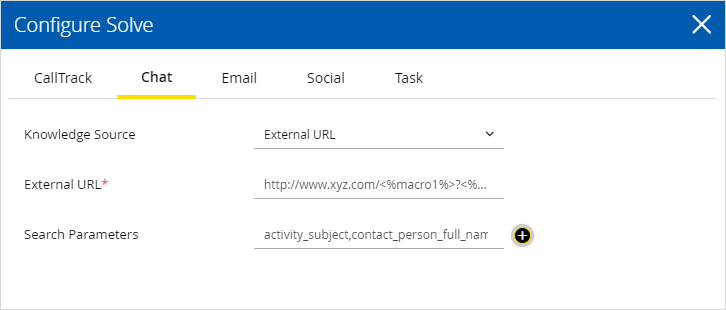
External URL: Select this option to provide access to any web page, for example, a particular page of your company’s website. For example, http://www.company_name.com. You can also construct dynamic URLs using macros. To construct dynamic URLs, do the following:
-
-
Macros should be added to the URL in the format <%macroN%>.
-
Numbers are assigned to the macros in the order in which they are picked in the Search Parameters field. For example, if you pick the following search parameters, in the specified order: activity_subject, country_code, the macros that get assigned to these parameters are: activity_subject: <%macro1%> and country_code: <%macro2%> Macros can be used in any order in the URL.
-
Use one of the following delimiters characters at the end of each macro: ‘<‘ ‘+’ ‘!’ ‘,’ ‘.’ ‘?’ ‘:’ ‘;’ ‘"’ ‘\’ ‘&’ Whitespace Characters.
-
Search Parameters: Click the Add
 button. In the Select Parameters window, select from the macros configured in the system. You can select multiple macros. When the Solve button is clicked, the external URL is called with the text of the macros.
-
-
-
Click the Save button to close the window.
-
Click the Save button.