Configuring Custom Actions
Custom Actions connect the AI Agent to external APIs, enabling it to retrieve data or trigger processes from third-party systems during a conversation. When a customer query matches a configured action, the AI Agent calls the associated API endpoint and uses the response to assist the customer.
Built-In Retrieve Action
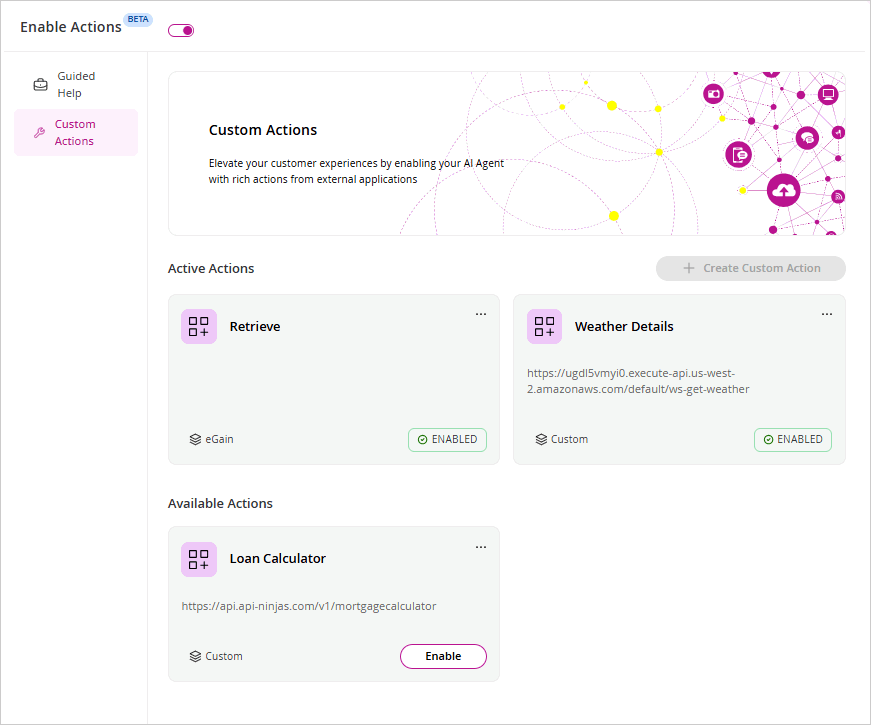
A built-in Retrieve action is included with every AI Agent. This action searches the agent's configured knowledge sources for documents relevant to the customer's query. It appears under Active Actions and is enabled by default.
You can view and edit the Retrieve action's name and description, but it cannot be deleted.
Prerequisites
-
The AI Agent must be saved before enabling actions.
-
The Enable Actions toggle must be turned on.
-
API credentials must be prepared before configuring authentication.
Creating a Custom Action
To create a custom action:
- From the My AI Agents page, select an AI Agent you want to edit and navigate to the Enable Actions section.
- Turn on the Enable Actions toggle if it is not already on.
- Select the Custom Actions node.
- Click + Add Custom Actions. The Create Guided Help panel opens.
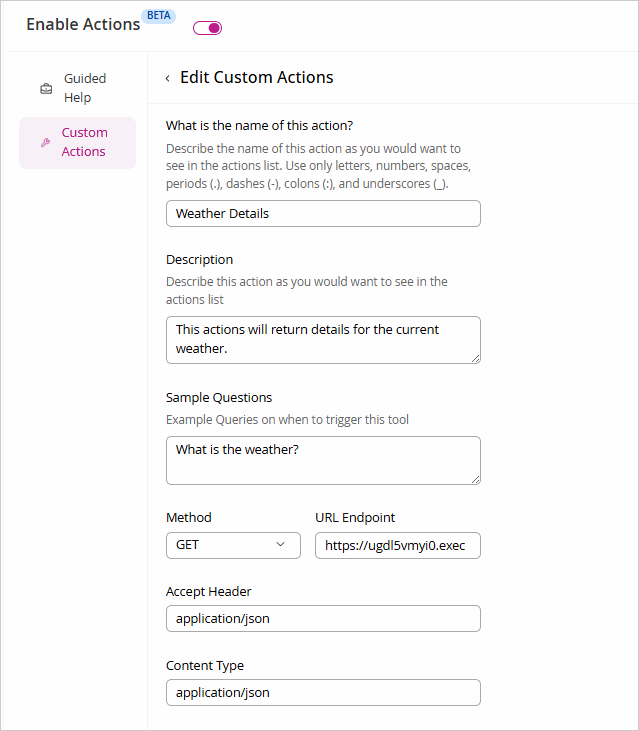
- Complete the fields as described below:
- Action Name: A unique name for this action as it appears in the actions list. Use only letters, numbers, spaces, periods (.), dashes (-), colons (:), and underscores (_).
- Description: A short description of this action as it appears in the actions list. Helps administrators identify the action's purpose.
- Sample Questions: Example customer queries that should trigger this action. The AI Agent uses these to determine when to invoke the action.
- Method: The HTTP method used to call the API. Select GET or POST from the dropdown.
- GET: Retrieves data from the API endpoint. No request body is sent.
- POST: Sends data to create a resource. A Body section is available to define the JSON payload and its variables.
- PUT: Sends data to update a resource. A Body section is available, identical in behavior to POST.
.
- URL Endpoint: The full URL of the external API endpoint (for example, https://api.example.com/action).
- Accept Header: The media type the API is expected to return. Defaults to application/json.
- Content Type: The media type of the request body sent to the API. Defaults to application/json.
-
Authentication: The credential used to authenticate API calls. Credentials are sourced from External Credentials, which are available across all workflows and actions. If no credential is selected, authentication defaults to none (unauthenticated).
-
To use an existing credential, select it from the dropdown. For more information, see Configuring External Credentials.
-
To create a new credential, select Create New Credential. A panel opens on the right with the following fields:
-
Credential Name: A descriptive name to identify the credential.
-
Authentication Type: The authentication method for the credential. Select from the following options:
-
API Key: Provide the Header Name and API Key Value.
-
Bearer Token: Provide the Token.
-
Basic Auth: Provide the Username and Password.
-
OAuth 2.0 (Client Credentials): Provide the Token URL, Client ID, Client Secret, and Scopes.
-
OAuth 2.0 (Authorization Code PKCE): Provide the Authorization URL, Token URL, Client ID, Redirect URI, and Scopes.
-
-
Base Endpoint URL (optional): The base URL of the API the credential applies to.
-
Click Test Connection to verify the credential, then click Save Credential. Saved credentials automatically appear in the credential dropdown wherever credentials are supported.
- Headers: Custom HTTP headers to include in the API request. Click + Add to add a header row. Each row contains the following fields:
- Header Key: The name of the HTTP header.
- Header Value: The value for the header.
- Query Params: Query parameters to append to the API request URL. Click + Add to add a parameter row. Each row contains the following fields:
- Query Param Key: The name of the query parameter.
- Query Param Description: A description of what the parameter represents.
- Click Save. The action appears under Active Guided Help once saved.
Managing Custom Actions
Active Actions
Lists all custom actions currently enabled for the AI Agent. Each action card shows the action name, its source (eGain for built-in actions), and its enabled status. You can Edit, Delete, or Disable the actions by from the Options menu.
Available Actions
Lists actions that have been created but are not yet enabled. You can Edit or Delete the actions by from the Options menu. Click the Enable button from this section to make them active in the chat widget.