Configuring Single Sign-On for SAML 2.0 Systems
Important things to note about SAML 2.0 Single Sign-On:
-
An identity provider (IdP) certificate is required for SAML 2.0 configurations. Consult your IT department about obtaining the IdP certificate.
-
Encrypted SAML assertion is supported. If you wish to enable encrypted SAML assertion, you will need a Java Keystore (JKS) file for the decryption certificate. A Java Keystore (JKS) file is necessary if the service provider is enabled to authenticate users in SAML 2.0, as well. Contact your IT department to obtain the Java Keystore file.
-
SAML is a time sensitive protocol and the IdP determines the time-based validity of a SAML assertion. If the identity provider and the service provider clocks are not synchronized, the assertion becomes invalid and stops the SAML SSO feature. For SAML SSO to operate, you must install the correct Network Time Protocol (NTP) setup and ensure the time for the IdP and SP applications is completely synchronized. Consult your IT department about synchronizing the IdP clock with the SP clock.
-
SAML 2.0 provides a well-defined, interoperable metadata format that can be used to expedite the trust process between the Service Provider (SP) and the Identity Provider (IdP). Metadata ensures a secure transaction between an identity provider and a service provider. To enable SAML, a Circle of Trust (COT) between the service provider and identity provider must be established. Consult your IT department about obtaining IdP and SP metadata. Note: SP metadata for customer portals, chat, agent portals, and the agent desktop should be provided separately. SAML metadata samples are also available for configuration. For details, see SAML 2.0 Metadata.
To configure SSO for SAML 2.0 systems:
-
From the Partition and Departments dropdown menu, go to the partition space.
-
From the Navigation menu, browse to Security > Single Sign-On > Configurations.
-
From the Select Configuration dropdown, select Agent.
-
On the General tab, set the following:
-
Name: This field is populated automatically and cannot be changed.
-
Description: This field is populated automatically and cannot be changed.
-
Enable Single Sign-On: Click the Toggle
 button to enable SSO.
 -
Allow local login for specific users: Select whether users should only be able to log in to the application through the SSO authentication methods, or if they can log in to the application locally as well. To enable local login, click the Toggle
 button. The type of authentication required of each user can be controlled at the user level. See Creating Department Users for more details.
 -
Single Sign On Type: Select SAML 2.0.
-
Create or Update user account on login: This field is used for user auto-provisioning. If you are not configuring your system for auto-provisioning, do not enable the Toggle
 button. To learn more about auto-provisioning users, see User Auto-Provisioning Through SAML 2.0.
 -
Certificate Expiry Notification Emails: Notifications regarding certificate expiry are now sent automatically to customers. This notification informs customers to update their metadata on their Single Sign-On IDP. Click the Add
 button to add email addresses to which the certificate expiry notification emails will be sent. In the Add Email window, enter the email addresses and click the Enter
  button. You can add multiple email addresses. Click Done to save.
-
-
On the SSO Configuration tab, the Service Provider can be allowed to initiate the authentication for SAML. For service provider initiated authentication, ensure that the External URL of Application setting is correctly configured. For more information, see General Partition Settings.
-
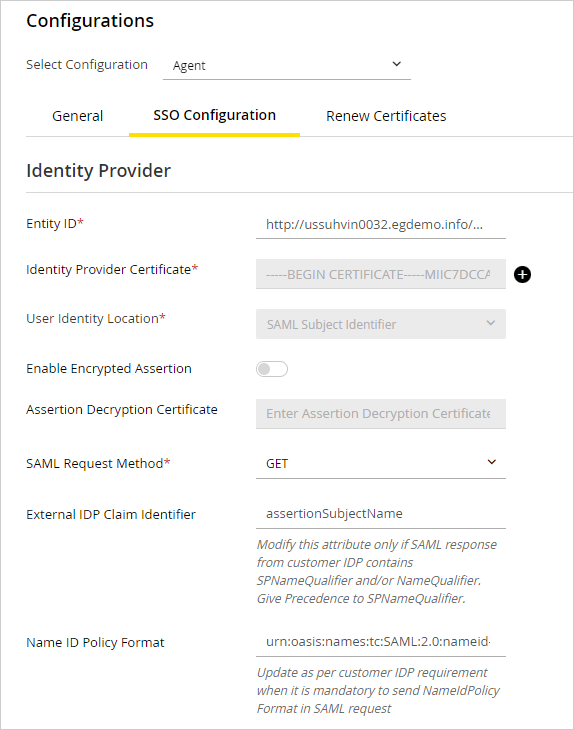
Under the Identity Provider section, provide the following:
-
Entity ID: Entity ID or the Issuer
-
Identity provider certificate: The public key certificate. The certificate must start with “-----BEGIN CERTIFICATE-----” and end with “-----END CERTIFICATE-----”
-
User Identity location: This is to set the identity location in the certificate to the default SAML subject identifier. The value for this field is set as SAML Subject Identifier by default.
-
Default to login name if user with the same email address exists:
When selected, if a user is logged in (ex User1), and a second user logs in with the same email address (User2), the user provisioning flow attempts to identify the logged in user based on email address first. User1 is identified as the logged in user, User2's attributes (e.g. first name, middle name, screen name, manager, custom attributes, user groups etc.) would be modified for User1, while the login ID or User1 would remain the same as before.
-
Enable encrypted assertion: Click the Toggle
 button to enable SAML encrypted assertion for console login.
 -
Assertion decryption certificate: If Enable Encrypted Assertion is enabled, click the Add
 button and provide the following in the Assertion Decryption Certificate window:
-
Java keystore file: Provide the file path of your Java Keystore File. This file will be in .jks format and contains the decryption key the system needs to access files secured by SAML.
-
Alias name: The unique identifier for the decryption key.
-
Keystore password: The password required for accessing the Java Keystore File.
-
Key password: The password required for accessing the Alias' decryption key.
-
-
SAML Request Method: The method used by a Service Provider (SP) to initiate authentication and authorization requests with an Identity Provider (IdP) in the SAML protocol. From the dropdown, select either of the following options: GET or POST.
-
External IdP Claim Identifier: The identifier issued by the IdP during the authentication process that the service provider can use to identify and authorize the user. The SAML Response from the customer IdP can contain either or both of the following:
-
NameQualifier: This attribute is used to qualify the name of a user or an entity, typically an identifier provided by an identity provider (IdP).
-
SPNameQualifier: This attribute is used to qualify the name of the service provider (SP) that is the intended audience for the SAML assertion.
-
-
Name ID Policy Format: This setting specifies the format of the user identifier issued by the Identity Provider in a SAML assertion to ensure consistent identification across systems. You should update this field only according to the customer's IdP requirements to include NameIDPolicy format in the SAML request.
-
Provide the following details when you want to enable federated SSO for users who are authenticated using an external IdP:
-
Entity ID: Entity ID or the Issuer
-
Identity Provider Certificate: The certificate must start with “-----BEGIN CERTIFICATE-----” and end with “-----END CERTIFICATE-----”
-

-
-
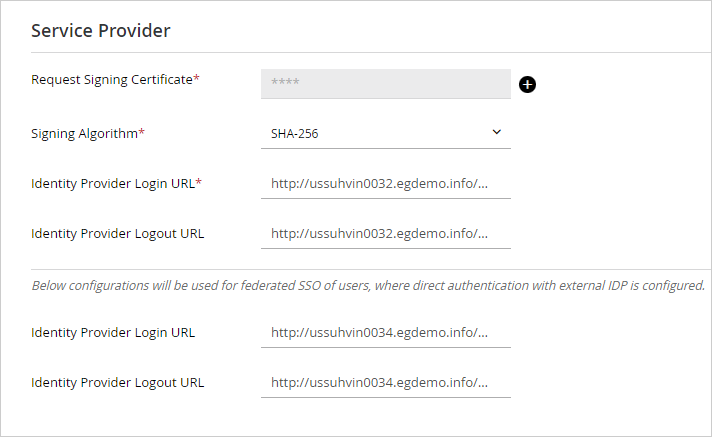
If you wish to allow the application to initiate the authentication for SAML, provide the following under the Service Provider option:
-
Request signing certificate: Click the Add
 button and provide the following in the Request Signing Certificate window and click Done.
-
Java keystore file: Provide the file path of your Java Keystore File eg: C:\keystore\v15\SSO\keystore.jks. This file is in .jks format and contains the decryption key the system needs to access files secured by SAML. On distributed installations, this should be stored on the application server.
-
Alias name: The unique identifier for the decryption key.
-
Keystore password: The password required for accessing the Java Keystore File.
-
Key password: The password required for accessing the Alias' decryption key.
-
-
Signing Algorithm: From the dropdown, select the signing algorithm.
-
Identity Provider Login URL: The URL for SAML authentication.
-
Identity Provider Logout URL: The URL to which users will be redirected upon logging out.
-
Provide the following details when you want to enable federated SSO for users who are authenticated using an external IdP:
-
Identity Provider Login URL: The login URL for SAML authentication.
-
Identity Provider Logout URL: The URL to which users will be redirected upon logging out.
-

-
-
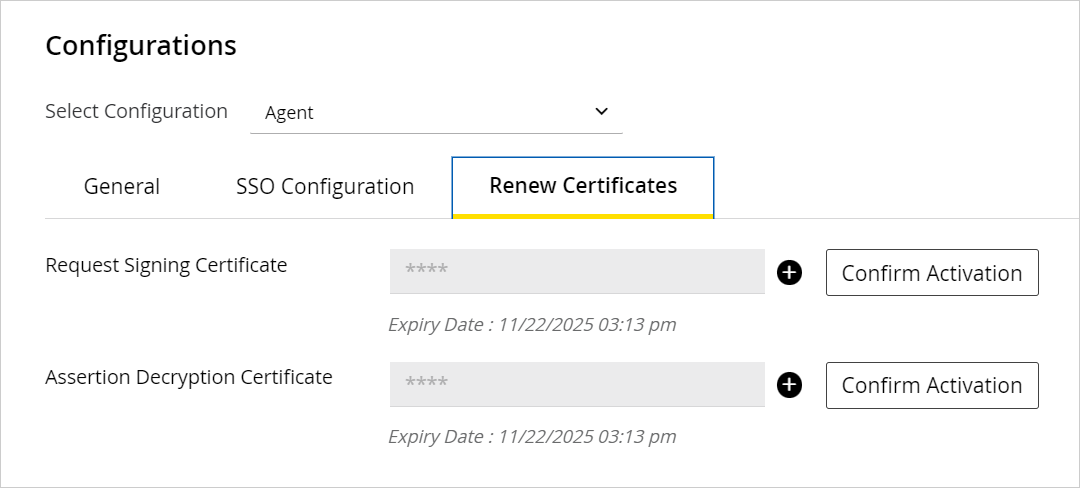
- On the Renew Certificates tab, you can renew the certificates that are close to their expiration date. When you receive an expiration notification on your email address configured in the Certificate Expiry Notification Emails settings, you can renew the Request Signing Certificate and the Assertion Decryption Certificate by performing the following steps:
- Click the Add
 button to open the renewed certificate and click the Copy Certificate Content button to copy the content of the certificate.
 - Paste the certificate content in a file and save it with a .cer extension and upload this certificate in the respective customer IDP for the given certificate.
- To confirm the same, log back into the Administration Console and click the Confirm Activation button next to the certificate that you have renewed. Please note that it is imperative to perform this step immediately after performing the previous step to ensure that the certificate is uploaded on the eGain IDP.

- Click the Add
-
Click the Save button.