Creating Department Users
If you are editing the properties of an existing user who is logged into the application, the user updates take effect only on the next login.
To create a department user:
-
From the Partition and Departments dropdown menu, select a department.
-
From the Navigation menu, browse to User > Users.
-
On the List page toolbar, click the New
 button.
 -
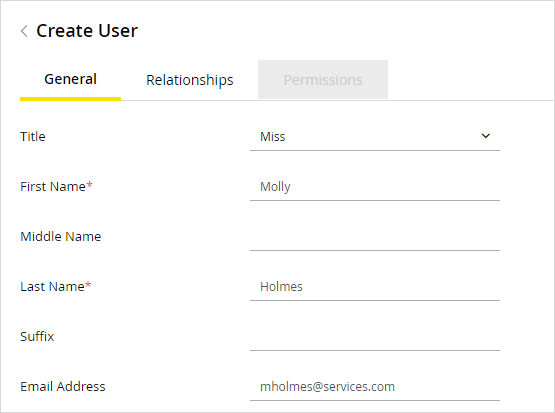
On the Properties page, on the General tab, set the following:
-
Provide the following details:

-
Title: From the dropdown list select a suitable Title. It is an optional field.
-
First Name: Type the first name of the user.
-
Middle Name: Type the middle name of the user. It is an optional field.
-
Last Name: Type the last name of the user.
-
Suffix: Provide the suffix. It is an optional field.
-
Email Address: Provide the email address of the user. It is an optional field.
-
-
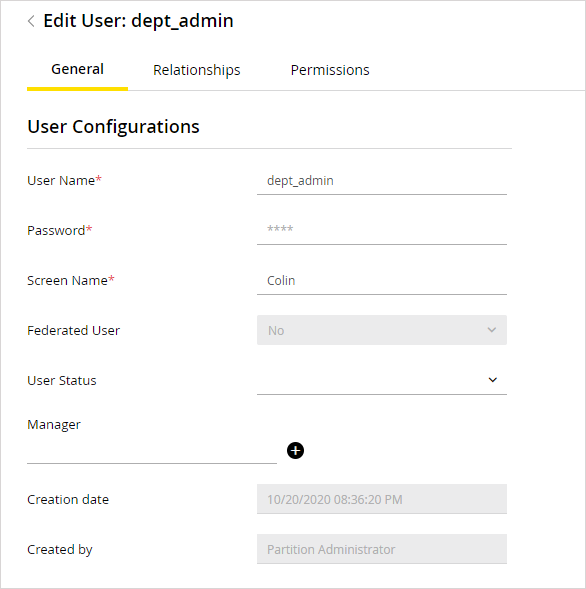
In the User Configuration section, provide the following details:

-
User Name: Type a name for the user. This name is used by the user to log in to the application.
-
Password: Type the password. There are important settings related to setting up password. For more details, see Security Settings.
-
Screen name: You need to set the screen name for any user who has a ChatPlus license. This is the name displayed to chat customers in the Chat Customer Console. You can use the same screen name for more than one user in the system. Do not change the screen name of an agent when the agent is logged in to the application and is servicing chats.
-
Authentication Type: By default, this field is disabled corresponds to Local login and cannot be changed when single sign-on has not been configured. If single sign-on has been enabled, by default, the value is enabled. This field can only be configured if single sign-on is configured for a partition and it allows local login for specific users. Select Yes to require agents to use their single sign-on authentication links to access the application or No to allow agents to access the application directly without the SSO authentication links.
-
User Status: Select the status of the user. By default, the new user’s status is Enabled. Once the user is saved, the following four options are available: Enabled, Disabled, Logged in, and Not logged in. For more information, see Changing user status.
-
Manager: Here you can set the manager of a user. For more details, see Specifying a user's manager.
-
Creation date: This field displays the date and time the user is created. The value is populated automatically when the user is saved and it cannot be changed.
-
Created by: This field displays the name of the user who created the user. The value is populated automatically when the user is saved and it cannot be changed.
-
-
Go to the Business section, and provide the following information. All the fields are optional.
-
Company
-
Division
-
Department
-
Job title
-
Work phone
-
Extension
-
Mobile number 1
-
Employment status: The options available are: Customer, Employee, Partner, and Reseller.
-
-
Go to the Personal section, and provide the following information. All the fields are optional.
-
Home address line 1
-
Home address line 2
-
Home city
-
Home state
-
Home zip code
-
Home phone
-
Mobile number 2
-
Secondary email address
-
-
-
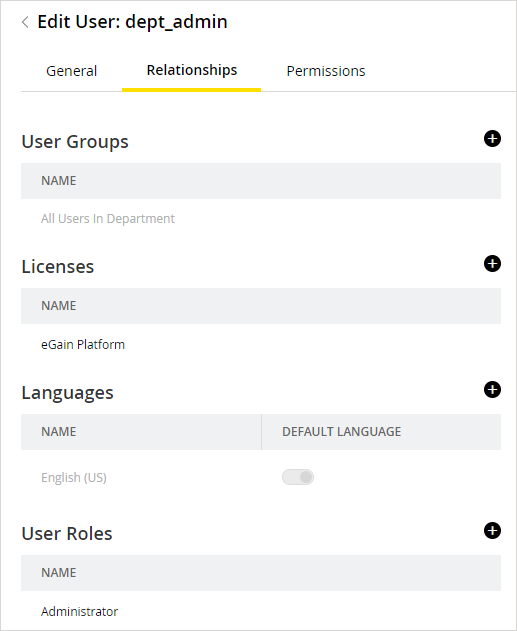
Go to the Relationships tab, and set the following:
-
In the User Groups section, click the Add
 button to select the user group to which you want to add the user. If you have not created any user groups yet, you can create them and add the users later. For more details, see Creating User Groups in Departments. Although it is optional to manage users through user groups, we highly recommend that you use groups as it makes user management easier.
When a user is added to a group, he is automatically assigned the roles and actions of the group. You can also choose to assign actions and roles to users individually; however, it is not recommended.
-
-
-
In the License section, click the Add
 button to assign licenses to the user. Based on the licenses bought for the installation, you may see all or a subset of the following licenses:
-
eGain Advisor Desktop
-
eGain Platform
-
eGain CallTrackPlus
-
eGain ChatPlus
-
eGain CobrowsePlus
-
eGain Cobrowse & ChatPlus
-
eGain Enterprise
-
eGain MailPlus
-
eGain Offers
-
eGain Knowledge+AI
-
-
-
-
In the Languages section, the KB language set as the default language in the KB primary language setting is automatically assigned to the user. If other languages are available, click the Add
 button to assign those languages to the user and you can change the default KB language of the user by clicking the Toggle button next to the language.
 -
In the User Roles section, click the Add
 button to select the roles to be assigned to the user. If you want to view the actions that come as part of the selected role, save the user and go to the Actions tab to see the list of actions.
-
In the Direct reports section, click the Add
 button to select the users who reports to this user. For more details, see Specifying a user's direct reports.
 -
Go to the User Attribute Settings section, and click the Add
 button to select a user attribute setting for the group. This lets you control the level of access a user has in the system. For more details on user attribute settings, see About User Attribute Settings.
 -
In the User Profiles section, click the Add
 button to select the search profiles for the user. Please note that you can only assign a maximum of 10 user profiles to any user. To assign more than 10 user profiles, you can assign the user profile to a user group and then add your users to it. For more details, see User Profiles.
 -
In the User Guided Help Profiles section, click the Add
 button to select a Guided Help profile. By default, system profile is selected.
 -
Next, in the Departments section, click the Add
 button to select the department with which you want to share the user across departments. For more details, see Sharing users.
 -
In the Actions section, you can view the list of actions assigned to the user. Click the Add
 button to assign additional actions to the user. You can identify how actions are assigned from the Grant field in the Selected actions section. The actions assigned explicitly show the value “Explicit”. If you want to allow the user to import and export content for translations from the Knowledge Console, assign the “Import Translation” and “Export Translation” actions to the user. It is highly recommended that you do not assign actions directly to the user. You should always create a user role, with the actions, and assign the role to the user. This makes user management easier. For more details on creating user roles, see Creating user roles.
-
-
Click the Save button to enable the Permissions tab.
-
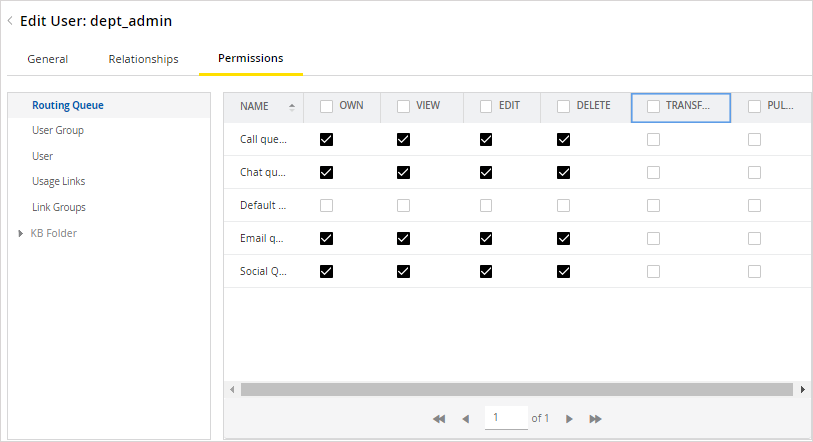
On the Permissions tab, assign permissions for the following objects.
-
Routing Queue: Own, View, Edit, Delete, Transfer activities, Pull activities
-
Usage Links: Own, View, Edit, Delete, Execute
-
Link Groups: Own, View, Edit, Delete, Execute
-
User: Own, View, Edit, Delete, Transfer activities, Pull activities
-
User group: Own, View, Edit, Delete, Transfer activities, Pull activities
-
KB Folder: Own, View, Edit, Delete, Create folder, Create article, Edit article, Delete article, Suggest article, Manage suggestions, View personal folder
-
If you have added a user to a user group, and the user group has permissions on various objects, then that permission shows selected and disabled. If you are using user groups for user management, you should assign permissions to user groups, and not to individual users.

-
Click the Save button.