Configuring Auto-Reply Node
Use this node to automatically send auto-replies to incoming emails. Auto-replies are emails, made up of knowledge articles, that are automatically sent to customers when conditions set in the auto-reply node are met. Before configuring an auto-reply node, create the content for the auto-replies in the form of articles in the Knowledge Console. Then, configure the conditions under which auto-replies are to be sent to customers.
Administrators can configure a set of rules, and for each rule, configure a different auto-reply. In a workflow, if both an auto-acknowledgement and an auto-reply have been configured, and both of them qualify to be sent, only the auto-reply is sent to the customer. No auto-acknowledgement is sent.
This node is not available in inbound social workflows.
To configure an auto-reply node:
- On the Properties page, on the Diagram tab, add the Auto-reply
 node in the Workflow Editor.
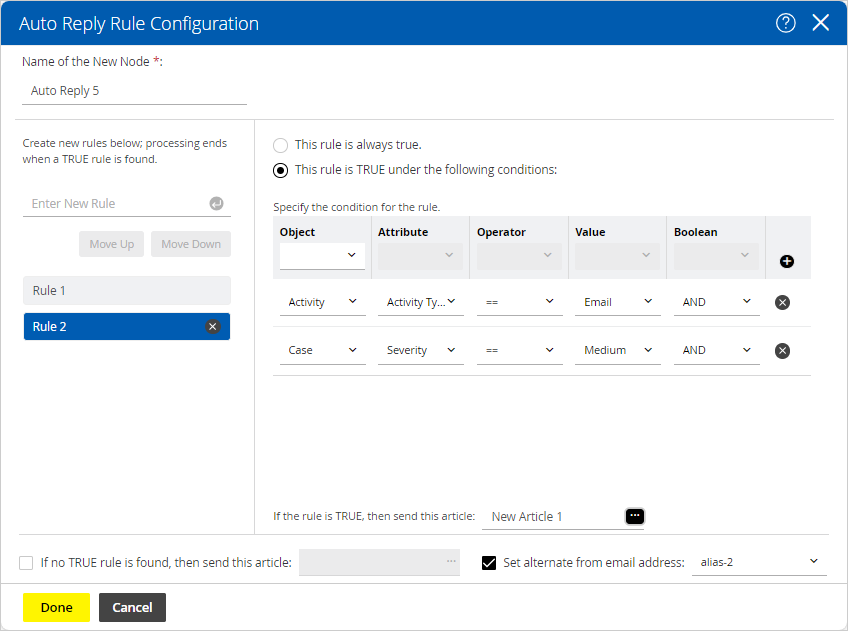
 - In the Auto-Reply Rule Configuration window, provide the following details:
-
In the Name field, provide a name for the node.
-
In the Rule Name filed, provide a name for the rule and press the Enter Key. Select the rule name to configure the rule properties.
-
Select one of the following options:
-
This rule is always true
-
This rule is true under the following conditions
-
-
If you have selected the This rule is true under the following conditions option, configure the conditions when the rule is true.
-
-
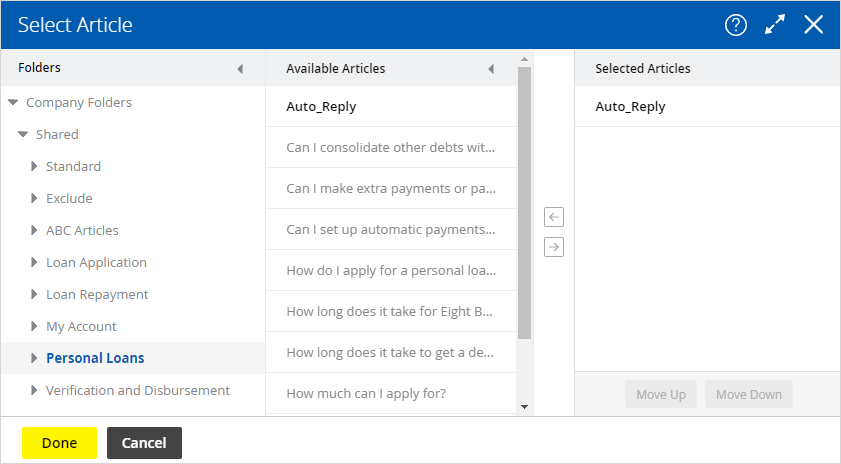
Next, select the articles to be sent as an auto-reply if the conditions configured in the rule are met. Click the Select Article button and from the Select Article window select articles for auto-reply. You can select multiple articles and configure the order in which they should appear in the reply. When the auto-reply is sent, all the selected articles are combined together in the order they are selected and sent out as one email.
-
Likewise, you can create multiple rules.
-
-
If you have created more than one rule, use the Move Up and Move Down button to change the order of the rules.
-
You can now set an alternate from email address to send auto-acknowledgement responses. click the checkbox next to the Set alternate from email address setting and select an alias from the dropdown.

-
Lastly, you can also send an auto-reply if no rules are found true. Select the If no TRUE rule is found, then send this article option, and select the articles to be sent as auto-reply. Click the Select Article button and from the Select Article window select articles for auto-reply.

-
-
Click the Done button to close the window.
Related Topics