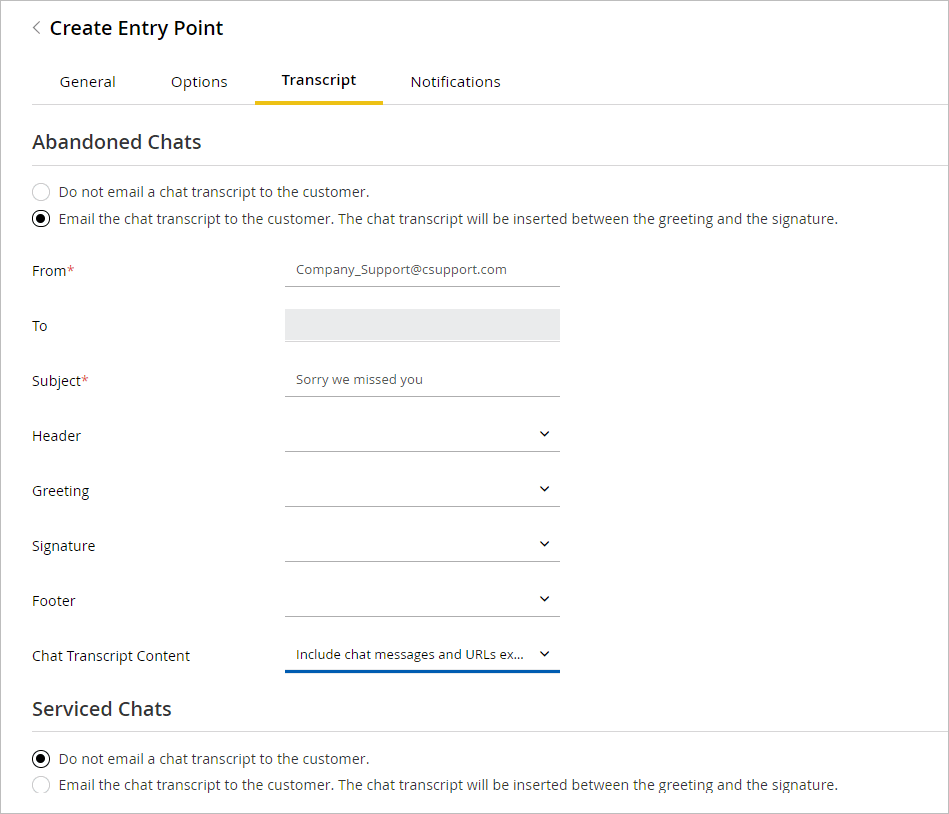
Setting Up Transcripts
Chat transcripts can be emailed to customers. This includes transcripts for both serviced and abandoned chats. Serviced chats are those chat sessions where the agent joins the chat session at least once (activity substatus changes to “In Progress”) before the customer exits the session. Serviced chats also include chats that were not completed successfully because of some error. Abandoned chats are those chat sessions where the customer exits the chat before the activity substatus changes to “In Progress” at least once. This means the customer leaves the chat before an agent could attend to him.
In the transcript email that is sent, the chat transcript is placed between the greeting article and the signature article. For video chats, only the text messages exchanged between the agent and the customer and the URLs shared by the agent are emailed to customers. The video and audio parts of the interaction are not included in the transcript.
Before getting started, the header, footer, signature, and greeting knowledge articles should be created to be used in the chat transcript email. The articles must be created from the Knowledge Console.
To email chat transcripts to customers:
-
From the Navigation menu, browse to Apps > Chat & Messaging > Entry Points.
-
On the List page, select an entry point.
-
On the Properties page, on the Transcript tab, go to the Serviced Chats or the Abandoned Chats sections and select one of the following options:
-
Do not email a chat transcript to the customer: If you do not want to send a chat transcript, select this option. When you select this option, all other options will be disabled. This option is selected by default.
-
Email the chat transcript to the customer: If you want to send a chat transcript select this option. The chat transcript is inserted between the greeting and the signature.
-
-
In the Serviced chats or the Abandoned chats sections, provide the following details.
-
From: Type the email address which you want to show in the From field in the email sent to the customer. This is required information. Any reply sent by the customer, in response to the chat transcript email, goes to the address specified in the From field. You can configure a standard email address such as “support@mycompany.com” as the From email address and configure it as the email alias to which customer reply emails will be sent.
-
To: The transcript email is sent to the email ID provided by the customer while logging in to the chat. If the customer has not provided an email ID, then the contact point will be picked up from the existing email field for the customer of the chat. If a customer has multiple email IDs, the last updated email ID of the customer will be considered. However, if no email ID is found at all, no transcript mail is sent out.
This field cannot be edited.
-
Subject: Type the subject of the email.
-
Header: Click the Add
 button and from the Select Article window, select a header you want to use.
 -
Greeting: Click the Add
 button and from the Select Article window, select a greeting you want to use.
 -
Signature: Click the Add
 button and from the Select Article window, select a signature you want to use.
 -
Footer: Click the Add
 button and from the Select Article window, select a footer you want to use.
 -
Chat Transcript Content: Specify what you want to include in the transcript. From the dropdown, select one of the following options:
-
Include chat messages and URLs exchanged
-
Include only chat messages
-
Include only URLs exchanged
-

-
-
Click the Save button.
Related Topics