Publish Views
Different parts of an article may contain information that is more relevant to different audiences. Instead of requiring authors to create completely separate articles for each audience, individual content sections can be tagged to only display to users those parts that possess the same tag. Agents and website visitors with the correct user profiles can then read the article with the sections that apply to them. This method of content organization is called single-sourcing and is managed through the use of publish views.
The process is as follows:
-
Administrators create publish views and assign tags.
-
A knowledge author tags different sections of the article and assigns publish views.
-
A version of the article is generated by the system for each publish view assigned to the article. Users can only view a generated version if they have the corresponding set of tags in their user profile.
For example: An author has written an article with general information about a new model of tablets made by her company. There is a section of the article that only applies to the version of the tablet that cannot connect to the internet except through WiFi. The author has tagged that section with the "WiFi" tag and assigned the "WiFi" and "default" publish view to the article. When the article is published, two versions of the article are created: one version has the section for WiFi tablets and the other does not. A user who has the user profile containing the same access tags as the "WiFi" publish view can see the "WiFi" version of the article. If the user profile is changed to "default", they are unable to access the "WiFi" version of the article and instead are displayed the "default" article.
To create a publish view:
-
From the Partition and Departments dropdown menu, select a department.
-
From the Navigation menu, browse to Personalization > Publish Views.
-
On the List page toolbar, click the New
 button.
 -
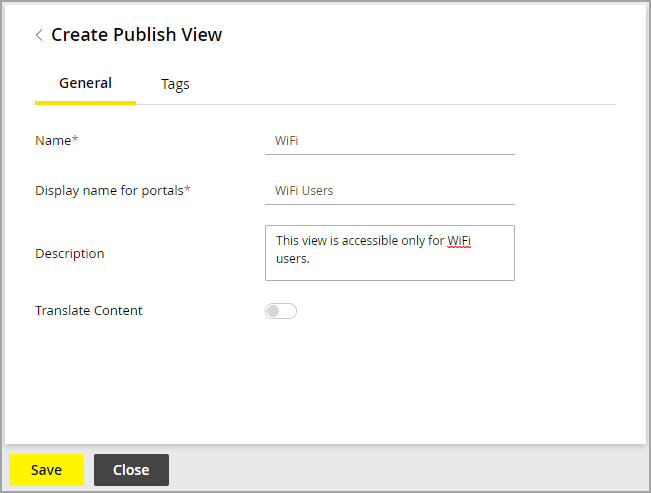
On the Properties page, on the General tab, provide the following:
-
Name: The name of the publish view.
-
Display name for portals: When publish views are assigned to an article visible on a knowledge portal, the display names are shown in the portal to users who can see more than one version of the article. This gives authors the option to use the Display name for portals when assigning publish view to articles.
-
Description: The description of the publish view.
-
Translate Content: Select Yes if you want this publish view to be considered for translation when the content is exported for translation.

-
-
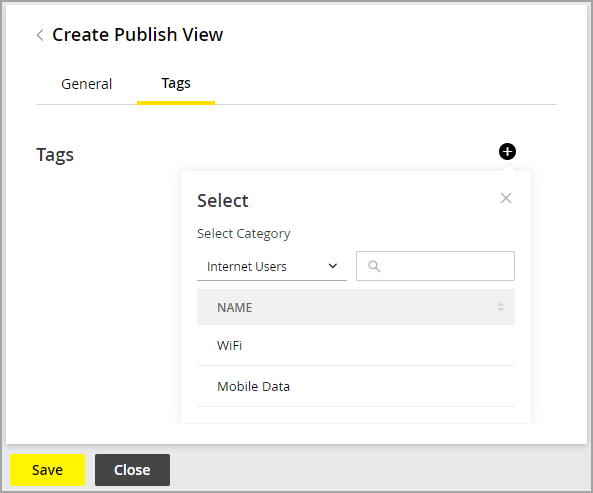
On the Tags tab, in the Tags section, click the Add
 button and select a category from the dropdown menu. Next, add tags for the publish view. More than one tag category can be used when creating a publish view. For more information, see Creating Tags.
Tag groups cannot be used to assign tags to publish views. Select a new tag category if necessary and repeat this process for each tag category until all the desired tags have been assigned.
-
Click the Save button.
Related Topics