Managing Provision Jobs
Agent Resource Sets and Resource Templates with skill groups of the same peripheral must be created prior to creating a provisioning job in the Bulk Provisioning Gadget. For more details about creating these objects, see Creating an Agent or Skill Group Set and Creating a Provisioning Template.
Creating Provisioning Jobs
To create a new provisioning job from the Bulk Provisioning Gadget:
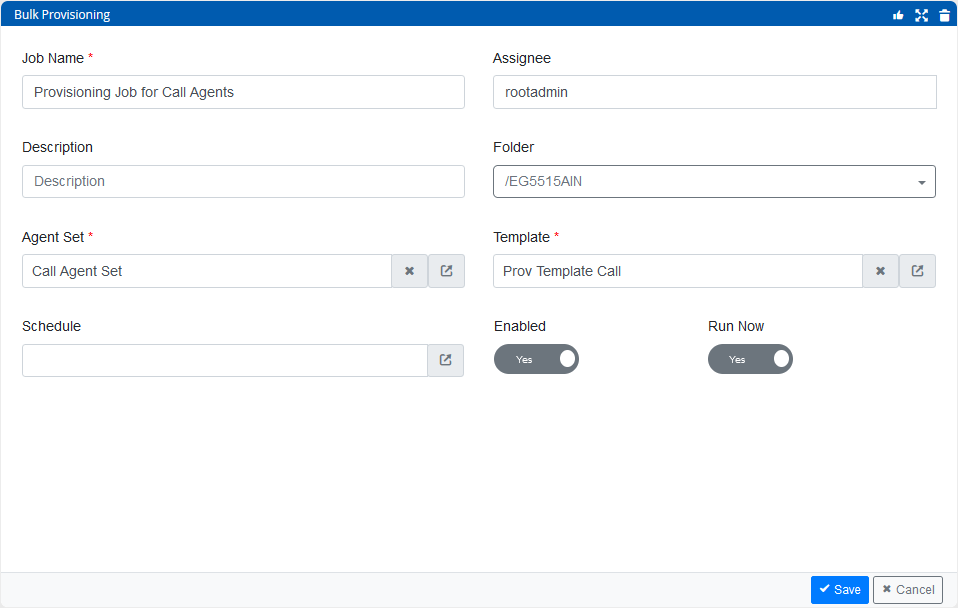
- Click the New button in the gadget footer. This opens the new job properties.
-
Enter the following details:
-
Job Name: Type a name for the job.
-
Assignee: This field is populated with your username and cannot be changed.
-
Description: Type a description for the job.
-
Folder: Select a folder in which the job should be located. The job is only visible to users with permissions to browse this folder.
-
-
To determine the agents to be provisioned by this job, click the pop-out button next to the Agent Set field. This opens a dialog in which you can:
-
Select the folder in which the Agent Set is located.
-
Select an Agent Set you created in the Resource Set Manager Gadget. For more details, see Creating an Agent or Skill Group Set.
-
Click OK.
-
-
To determine how the agents should be provisioned, click the pop-out button next to the Template field. This opens a dialog in which you can:
-
Select the folder in which the Provisioning Template is located.
-
Select a Provisioning Template you created in the Provisioning Resource Template Manager Gadget. For more details, see Creating a Provisioning Template.
-
Click OK.
Only templates with skill groups that have the same peripheral as the agents in the selected agent set are displayed.
-
-
In the Schedule field, click the pop-out button to set a calendar to determine when the job should run and how frequently. For more information about creating and selecting schedules for provisioning jobs, see Creating Calendars for Provisioning Jobs.
-
Click one of the following:
-
Enabled: Toggle this button between Yes to enable the job, or No to disable it. A disabled job does not run but it can still be saved and then enabled later.
-
Run Now: Toggle this button between Yes to run the job immediately, or No to make it following the schedule.
-
-
Click the Save button in the gadget footer to save the job or click the Cancel button to discard the job and return to the jobs list.
Creating Calendars for Provisioning Jobs
Provisioning jobs can be set to run multiple times at specific days and times. To do this, bulk provisioning calendars must be created. Likewise, it is possible to edit or copy existing calendars, in addition to creating new ones. A single calendar can be used by multiple provisioning jobs. Any changes made to the calendar, such as adding or removing scheduled times, take effect for all jobs that use it.
Each calendar can have one or multiple events. Each event in a calendar could also have a recurrence, such as every Monday at 6 AM or the first of every month at 7 AM. These recurrences can be scheduled to end at a specific time, after a certain number of occurrences, or to never end.
When multiple jobs are using the same calendar, or otherwise scheduled to run at the same time, they are queued so as not to overlap. Therefore, the run-time is approximate only.
To create calendars for provisioning jobs:
-
In the Bulk Provisioning Gadget, select a provisioning job to edit or create a new provisioning job. For more details, see Creating a Provisioning Job.
-
In the Schedule field, click the pop-out button. This opens a scheduling dialog.
-
Click the New button.
-
In the dialog that appears, provide the following:
-
Name of the calendar.
-
Description of the calendar.
-
Folder location of the calendar.
-
-
Click the New Event button.
-
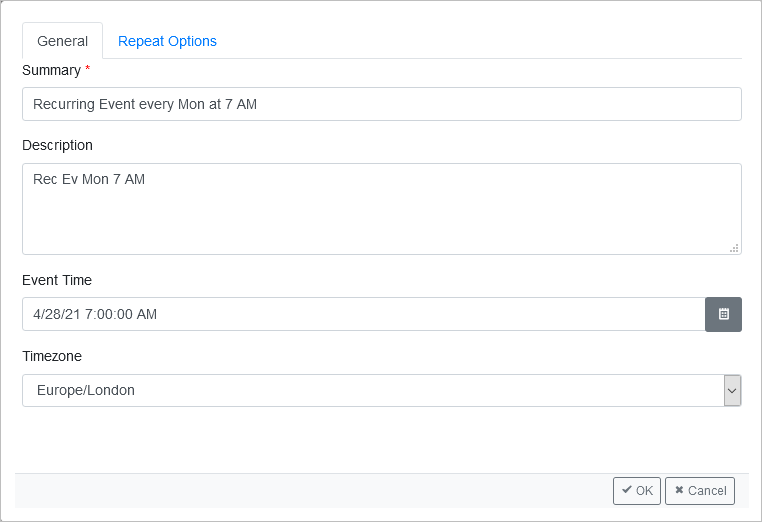
In the dialog that appears, on the General tab, perform the following:
-
Provide a brief summary of the calendar event.
-
Provide a brief description of the calendar event.
-
Select the Event Time. This can be set to the current time or a time in the future.
-
Select the Timezone for the job (your user timezone is the default).
-
-
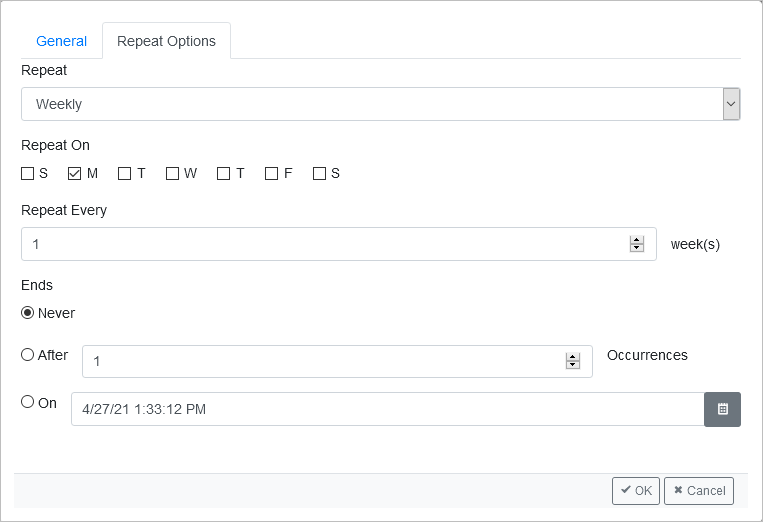
On the Repeat Options tab, perform the following:
-
Select the frequency in which the calendar event should repeat from the drop down menu. Options include: Never, Daily, Weekly, Monthly, Yearly, Hourly, Minutely.
-
Set the values for the number of times the job will repeat based on your frequency selected.
-
Set the requirements for the repetition of the event to end. Options include:
-
Never: The event will be repeated on this calendar with no end date.
-
After: The event will cease repeating after the number of occurrences specified in this field.
-
On: The event will cease repeating after the date and time specified in this field.
-
-
-
Click OK to save the event or Cancel to discard the event.
-
Click the New Event button and repeat the previous steps to add another event. One job can have multiple events in parallel, but they must all be defined in the same time zone.
-
In the Calendar dialog, select an event in the list and click Edit to modify it or click Delete to remove the event from the list.
-
When you are satisfied with all the events assigned to the calendar, click the Save button to save your changes or Cancel to discard the calendar. A saved calendar is displayed in the list of options when editing the schedule of a provisioning job.
Editing Calendars for Provisioning Jobs
To edit a calendar for provisioning jobs:
-
While creating or editing a provisioning job, in the Schedule field, click the pop-out button. For more details about creating provisioning jobs, see Creating a Provisioning Job.
-
In the dialog that appears, select an existing calendar from the list.
-
Click OK to close the dialog.
-
In the Schedule field, click the Edit button. This displays the calendar edit dialog in which you can add, edit, or delete events, as well as adjust the basic details about the calendar.
-
When you are satisfied with your changes, click the Save button.
An on-screen warning is displayed if the calendar is used by other jobs of which you have visibility that may be affected by changes. However, there may be jobs that use the calendar of which you do not have permission to see. In this situation, you are not permitted to save any changes to the calendar.
Copying Calendars for Provisioning Jobs
To copy a calendar for provisioning jobs:
-
While creating or editing a provisioning job, in the Schedule field, click the pop-out button. For more details about creating provisioning jobs, see Creating a Provisioning Job.
-
In the dialog that appears, select an existing calendar from the list.
-
Click the Copy button. This displays the calendar edit dialog in which you can add, edit, or delete events, as well as adjust the basic details about the duplicate calendar.
-
When you are satisfied with your changes, click the Save button to save the copied calendar and add it to the selected provisioning job's schedule.
Browsing Provisioning Jobs
The Bulk Provisioning Gadget lists all jobs that the user is entitled to see, based on folder permissions. Jobs that are neither assigned to you or assigned to users that you are allowed to see in the application are not visible.
For each job, the following details are listed:
-
The status of the job.
-
The name of the job.
-
The owner (the user to which the job is assigned).
-
The latest run time of the job.
-
The next scheduled run time of the job.
-
A checkbox to indicate whether the job is enabled.
-
An indicator to denote the success of the job during its last 10 runs.
-
A button to run the job immediately.
-
A button to monitor the job.
-
A button to edit the job.
- A button to delete the job.
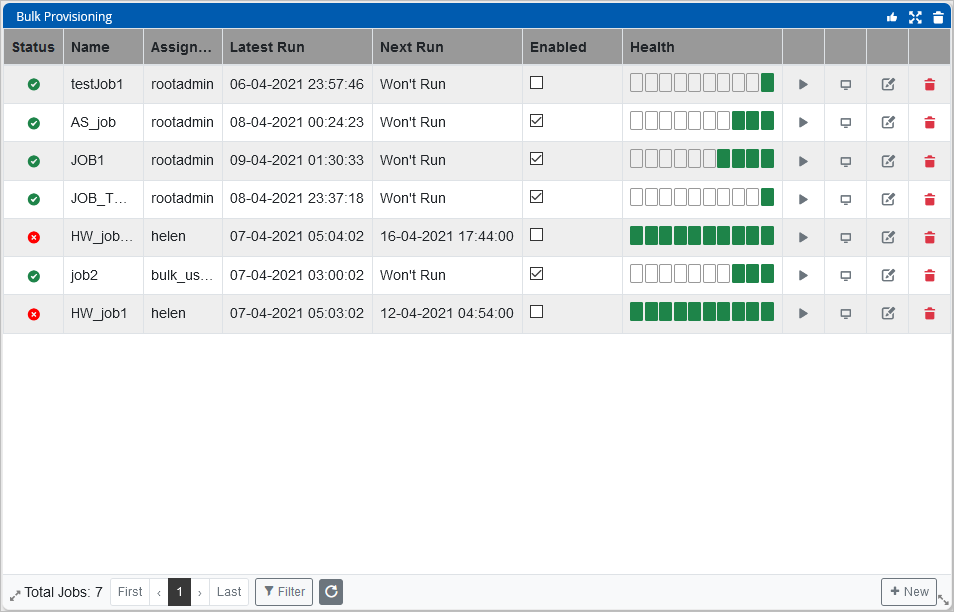
At the foot of the list there are pagination controls to navigate the pages of the list. It is possible to select the number of jobs to show per page.
To find specific jobs:
-
Click the Filter button in the gadget footer. This opens a filter dialog. All filtering options are optional and some can be used in combination with each other:
-
Name: Type a phrase into the field and select one of the filtering options: Contains, Begins with, Ends with, Equals.
-
Running Now: Click the checkbox to show jobs that are running at the present time.
-
Failed in last 10: Click the checkbox to show jobs that have encountered any errors in their last 10 runs.
-
Only Enabled: Click the checkbox to show jobs that are enabled.
-
Only Disabled: Click the checkbox to show jobs that are not enabled.
-
All: Click the checkbox to show jobs that are enabled and jobs that are not enabled.
-
-
Click OK to filter the list of jobs accordingly.
Monitoring the Success of a Provisioning Job
The list of Provisioning Jobs includes an indicator of success to denote whether the last 10 runs of a given job were:
-
Fully successful (denoted as green).
-
Partially successful but encountered some errors that prevented certain agents from being provisioned (denoted as amber).
-
Pending as the job is waiting to start (denoted as empty).
-
Failed (denoted as red).
To investigate the nature of the errors that were encountered on a given job:
-
Click the box in the Health column that you wish to view. This opens a window showing the batch requests for that job and the various options that took place, as well as their statuses.
-
Click the Monitor button for that job. This opens the job properties, which includes a list of the errors that were encountered. For each row, you can click the pop-out button to see the batch requests for that particular instance in which the job was run (the batch request information is only available within 60 days of the job running).
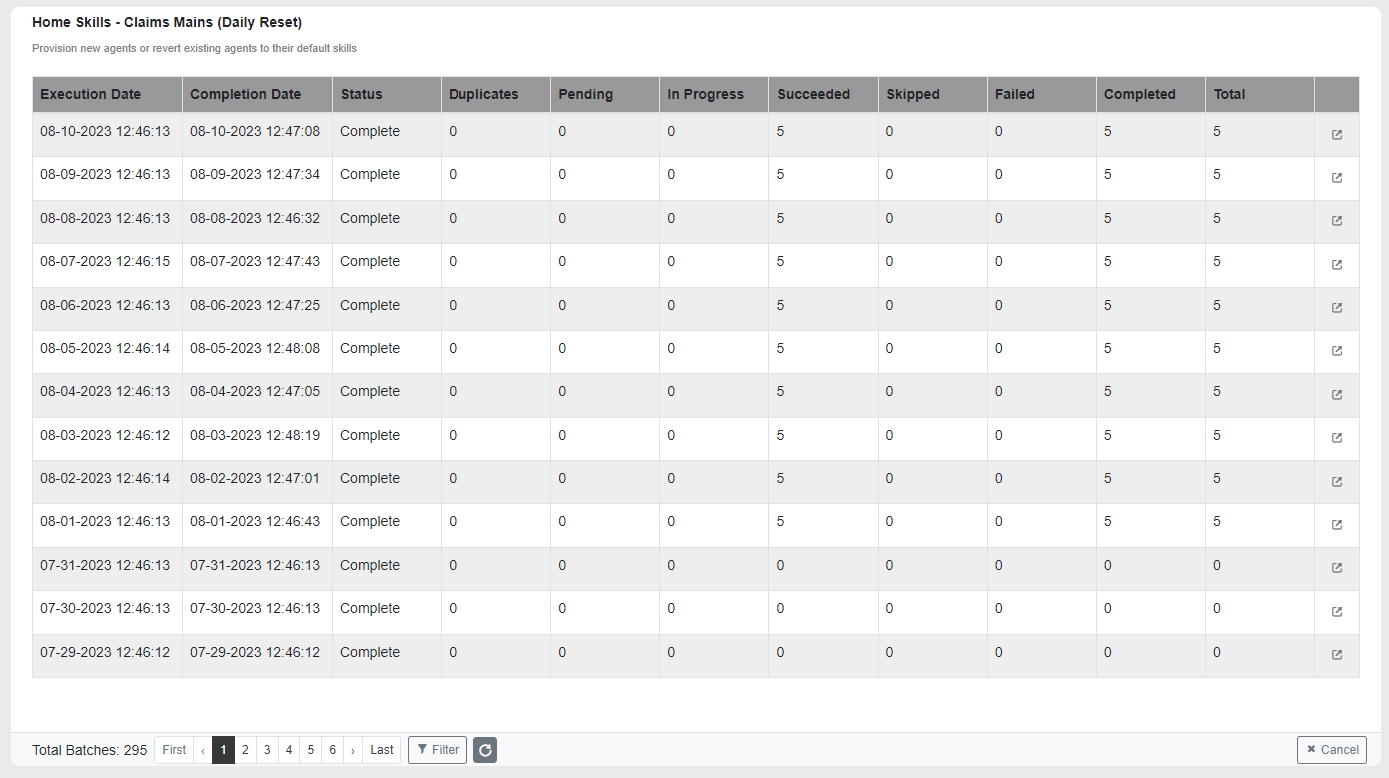
The columns in the list have the following meanings :
- Execution Date: The date and time at which the provisioning job began to execute, either because it was scheduled or because it was run manually.
- Completion Date: The date and time at which the provisioning job completed its execution, meaning that all necessary provisioning requests have been added to the queue and either succeeded, skipped or failed. If the job is still pending or in progress, this will show the value as Not complete.
- Status: Indicates if the provisioning job completed its execution or is still in progress.
- Duplicates: This shows a count of the number of requests from the job that were duplicates. These were not added to the provisioning queue and did not progress any further. For more information, see About Duplicates.
- Pending: This counts the number of requests from the job that have been added to the queue and are waiting to be fulfilled.
- In Progress: This counts the number of requests from the job that are being processed now in real-time.
- Succeeded: This counts the number of requests from the job that have been completed successfully, so that skill groups are now provisioned to, or removed from, agents as required by the job.
- Skipped: This counts the number of requests from the job that have been skipped as they were redundant. For example, if the job specified that an agent should become a member of a skill group, but it was found that they are already a member. This is subtly different than duplicates, where there is already an identical request in the queue. For skipped requests, there was not an existing request in the queue – instead the agent must have been provisioned on some prior occasion and had not been reverted since.
- Failed: This counts the number of requests from the job that have experienced a failure and exceeded their retry attempts without success. The job is not able to fulfill these provisioning requests. For example, the request might have been blocked by a permissions issue, or one of the resources (agent or skill group) may be in a state that does not allow it to be provisioned.
- Completed: This counts the number of requests from the job that have been completed successfully, skipped or which have experienced a failure and exceeded their retry attempts without success. No further action will be taken on these requests. It should be equal to the sum of Succeeded, Skipped and Failed requests.
- Total: This counts the total number of requests from the job that were added to the provisioning queue. Should equal the sum of Pending, In Progress, Succeeded, Skipped and Failed. Does not include Duplicates as these were not added to the queue.
Editing a Provisioning Job
Only the owner of a Provisioning Job can modify it. Another user can make themselves the owner of the job and is then entitled to save any other changes.
To edit a provisioning job:
-
Locate the job you wish to edit and click the Edit button in the job's row. This opens the job properties.
-
If not the current owner of the job, click the Assign job to me button to make yourself the owner.
-
Edit details as desired, including enabling or disabling the job.
-
Click the Save button in the gadget footer to save the changes or click the Cancel button to discard any changes and return to the jobs list.
Deleting a Provisioning Job
Only the owner of a Provisioning Job can delete it. Another user can make themselves the owner of the job and is then entitled to save any other changes.
To delete a provisioning job:
-
Locate the job you wish to delete and click the Delete button in the job's row. You are prompted to confirm the deletion.
-
Alternatively, you can delete the job from the Edit view as well.
-
Locate the job you wish to delete and click the Edit button in the job's row. This opens the job properties.
-
If not the current owner of the job, click the Assign job to me button to make yourself the owner.
-
Click the Delete button in the gadget footer. You are prompted to confirm the deletion.
-
About Duplicates
It is possible for there to be duplicate provisioning requests in quick succession. For example, two provisioning jobs might independently determine that the same agent should be provisioned to the same skill group.
It should be noted that provisioning is asynchronous and not instantaneous. When a bulk provisioning job executes, or when a user makes provisioning changes manually via Resource Manager, a list of provisioning requests are added to a queue to be fulfilled. All requests in the queue are fulfilled on a first come, first served basis.
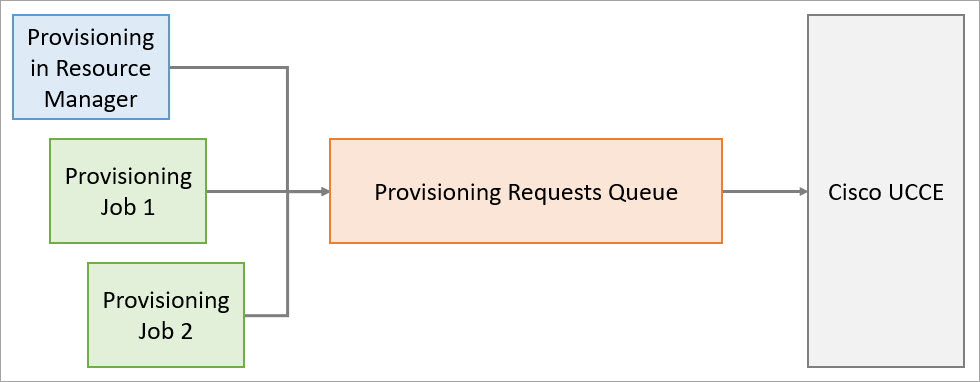
When provisioning requests are generated by a bulk provisioning job, the application checks the queue to see if there are already requests in the queue for the same agent and skill group. If so, then the application evaluates if the current job is merely duplicating a request that will already be fulfilled, and not undone, by the time the latest request would get to the front of the queue.
If the latest request is found to be a duplicate then it is filtered out and not added to the queue. Such requests are counted in the Duplicate column in the Job history.
For example, a provisioning job executes and determines that Jane Smith should be added to the Billing Complaints skill group, so the application will check if the queue contains prior requests to either add Jane Smith to this skill group or remove her from it. There are several possible outcomes:
|
Scenario |
Requests already in Queue |
Result |
|---|---|---|
|
A |
None |
Jane Smith will not be assigned to the Billing Complaints skill group by the time the current request would get to the front of the queue, therefore the current request will proceed into the queue. |
|
B |
|
Jane Smith will already be assigned to this skill group by the time the current request would get to the front of the queue, due to request #1, therefore the current request is a duplicate and will not be added to the queue. |
|
C |
|
Jane Smith will not be assigned to the Billing Complaints skill group by the time the current request would get to the front of the queue, due to request #2, therefore the current request will proceed into the queue. |
|
D |
|
Jane Smith will already be assigned to this skill group by the time the current request would get to the front of the queue, due to request #3, therefore the current request is a duplicate and will not be added to the queue. |
Note that a provisioning job containing only duplicates will not be marked as completed until all older requests in the queue are completed, even though the job itself did not add any further requests to the queue. It is therefore possible for a job to appear to be in progress without having any requests that are pending or in progress, only requests that are duplicates. The reason why the job is not marked as complete yet is to avoid giving the impression that the duplicated requests were provisioned already, when in fact they will be provisioned by the older requests in the queue.
Related Information