Uploading Templates
If the list of sample templates available does not seem to have enough options, you can upload your own templates for a more personalized look.
Offers Managers can download existing offer templates and upload new ones. After downloading the offer templates, an Offers Manager can customize it by modifying the CSS, images, or HTML contents of the offer banner in a template file. Once customized, the Offers Manager can then upload the modified template.
Offers Template Contents
The following files and folders are required to be a part of the Offers Template .zip file when uploaded to the application. All file names and folders are case sensitive. Folders and files that are not mentioned below cannot be uploaded to the application:
-
Template folder
-
ReadMe.html
-
egpsoffer.template
-
CSS folder
-
egpsoffer.css
-
Any other CSS files
-
-
Image folder
-
bg.gif (background image)
-
Any other image files
-
-
To see examples of what a template .zip file contains, see Downloading Templates.
Preparing the Template Files
Before uploading any new templates to the application there are several preliminary steps that must be taken to ensure that the template functions properly.
To prepare a template for upload:
-
Download an existing Offers Template from the application.
-
Unzip the offers template files to a temporary folder on your desktop.
-
Edit the egpsoffer.template file. The egpsoffer.template contains the HTML content to be shown as part of the offer banner when it is displayed to an end user.
-
This file must have parent div as <div id = \"egofr-INTERNAL_TEMPLATE_NAME-container\" class=\"styleclassname\">
-
-
Choose a unique internal template name that you will use to update the egpsoffer.template file. This must be consistent throughout the egpsoffer.template file and all CSS files.
-
-
All div elements in the egpsoffer.template file must also reflect the same internal template name.
-
-
Example: If the template Santa has been downloaded, its egpsoffer.template file would contain the div element with the id of: egofr-santa-container. Here, santa is the internal template name. If the offers manager decides to choose the new internal template name as santa01, then they must change the div id to: egofr-santa01-container.
-
-
Additional information for egpsoffer.template file:
-
-
This file would contain only HTML code. Any javascript code is not allowed in this file. If needed, javascript code should be the part of the egpsserviceshook.js file.
-
For form fields offers, the form ID must be in the format: egofr-INTERNAL_TEMPLATE_NAME-form. The form element must not have an action attribute.
-
The egpsoffer.template file can have only one or none accept buttons and one or none reject buttons.
-
-
-
Edit the egpsoffer.css file located in the CSS folder. This file contains the CSS content to be shown as part of the offer banner. There must be at least one CSS file with the name egpsoffer.css in the CSS folder.
-
egpsoffer.css must have the following classes:
-
.egofr-TEMPLATE_INTERNAL_NAME-container (This is the class for main div)
-
.egofr-TEMPLATE_INTERNAL_NAME-bottom-right (this for positioning)
-
.egofr-TEMPLATE_INTERNAL_NAME-bottom-left (this for positioning)
-
.egofr-TEMPLATE_INTERNAL_NAME-top-right (this for positioning)
-
.egofr-TEMPLATE_INTERNAL_NAME-top-left (this for positioning)
-
.egofr-TEMPLATE_INTERNAL_NAME-center (this for positioning)
-
-
All div tags in the egpsoffer.css file must also reflect the same template internal name.
-
Choose a unique template internal template name that you will use to update the egpsoffer.css file. This must be consistent throughout the egpsoffer.template file and all CSS files.
-
Example: If the template Santa has been downloaded, its egpsoffer.css file would contain class names such as: .egofr-santa-btnOK, .egofr-santa-btnOK:hover, #egofr-santa-container, etc. Here, santa is the internal template name. If the offers manager decides to choose the new internal template name as santa01, then he must change the above mentioned and all other classes in egpsoffer.css to: .egofr-santa01-btnOK, .egofr-santa01-btnOK:hover, #egofr-santa01-container etc.
-
-
Additional information for egpsoffer.css file:
-
Each class name must start with .egofr-INTERNAL_TEMPLATE_NAME- so that it becomes unique across all other templates.
-
If stylesheet classes are defined in other CSS files, then those CSS files must be a part of the CSS folder and it can be imported from the egpsoffer.css file by using the CSS @import rule. There are no validations on the additional CSS files that are added to the CSS folder.
-
Any folders or files other than the CSS file type are not allowed to be uploaded as part of this folder.
-
Since CSS features are browser dependent, offers might appear differently on each version of all supported web browsers. It is strongly recommended that you test your offer templates on each version of all supported web browsers for your web site.
-
-
-
Edit the image folder for any additional images that may be part of the offers template. This folder contains all images that are a part of the offers template set.
-
This folder must have a bg.gif image file. This file is used to show the thumbnail when previewing an offers template during the offers creation process.
-
Any additional file in this folder must be a MIME type image file.
-
Do not add any subfolders to the images folder.
-
-
Package your Offers Template file.
-
All files and folders mentioned in this ReadMe are case sensitive.
-
The offers template ZIP file must contain a CSS folder, an image folder, and a template file. The ReadMe file will be ignored during the upload process.
-
The offers template folder name can be different from the internal template name.
-
The offers template must only be packaged in .zip format.
-
The ZIP file size must be less than the size mentioned in the Maximum allowed size (in KB) of zip for uploading offer template setting. The maximum capacity for the template file can be adjusted in Offers Settings.
-
-
The Offers Template is now ready to be uploaded.
Uploading a Prepared Template
Once you have finished all the necessary preparations with the Offers Template files, you can upload the template to the application.
To upload a template:
-
Go to the Template List View.
-
Click the New
 button.
 -
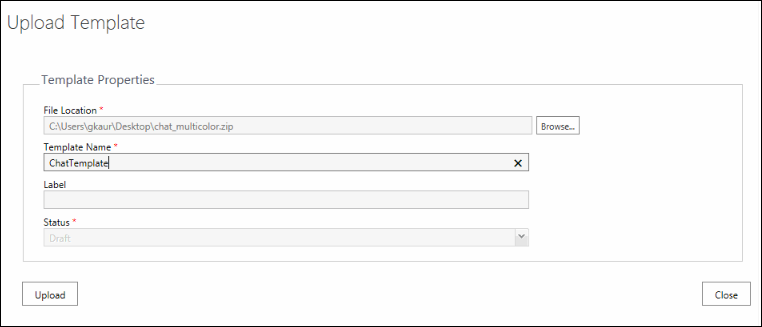
In the Upload Template window, provide the following details:
-
File Location: Provide or browse to the location of the template .zip file you would like to upload.
-
Template Name: Provide a brief description.
-
Label: Provide a label for the page. Labels are used to group templates.
-
Status: This defaults to Draft and cannot be changed during template creation.
When a template is first uploaded, it enters the Draft stage. While in the Draft stage, the template can still be edited or deleted, but it does not appear as an option during offer creation. Before a template can be used to create an offer, it must be Published. To learn more, see Publishing Templates.
-
-
Click the Save or Save and Close button. The list page is refreshed and you see the template is available. If any errors occur, the application explains what must be addressed before the Offers Template file can be successfully uploaded.