Creating Offers
To create an offer:
-
Go to the Offers screen.
-
Click the New
 button.
 -
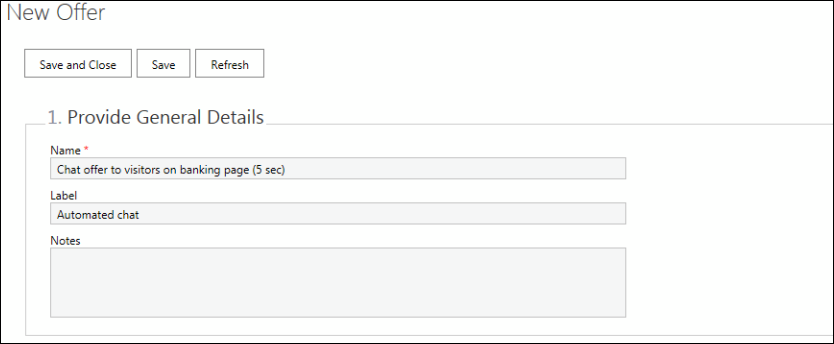
In the New Offer window, provide the following in the General Details section:
-
-
Name: Name of the offer.
-
Label: A label for the offer. Labels are used to group offers.
-
Notes: Internal notes for the offer.
-
-
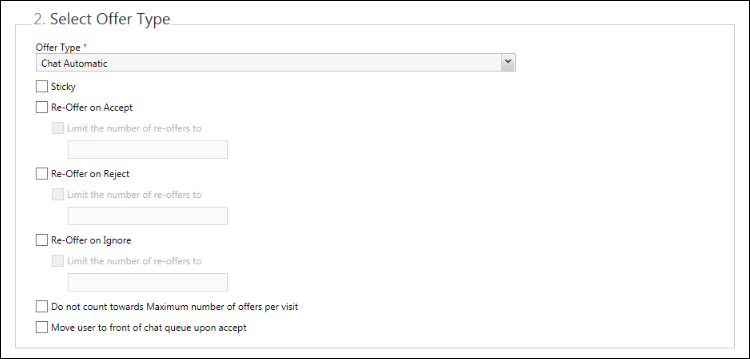
In the Select Offer Type section of the page, set the following:
-
Offer type: Select an offer type.
-
The Content offers available are:
-
-
-
Chatbot
-
Contact Us
-
Coupon
-
FAQ
-
KB Article
-
Landing Page
-
Marketing Content
-
Sales Promotion
-
Service Inquiry
-
Subscription
-
Survey
-
-
The Agent offers available are:
-
-
-
Chat Automatic
-
Chat Agent
-
Phone Automatic
-
-
Sticky: Select this option if you want the offer to always stay on the page as long as the web site visitor stays on that page. The offer does not automatically disappear when the visitor accepts or ignores it. It is only removed from the page when the visitor explicitly rejects the offer.
-
Re-offer on Accept: Select this option if you want to present the same offer again after the offer has been accepted during the session. An accepted offer may be presented again while the user remains on the same page, or if they move to another page for which the same offer is active.
The time interval after which the offer is presented again on the same page is configured in the Offers Settings. If the user moves to a new page for which the same offer is active, then it will be presented when it becomes eligible again. -
-
Limit the number of re-offers to: Select this option to limit the number of times you want to re-offer an accepted offer within a single session.
-
-
Re-offer on Reject: Select this option if you want to present the same offer again after the offer has been rejected during the session. A rejected offer may be presented again if the user moves to another page for which the same offer is active. It will not be presented again as long as the user remains on the same page on which the offer was rejected. If the user moves to a new page for which the same offer is active, then it will be presented when it becomes eligible again.
-
-
Limit the number of re-offers to: Select this option to limit the number of times you want to re-offer a rejected offer within a single session.
-
-
Re-offer on Ignore: Select this option if you want to present the same offer again if the offer was ignored once during the session. An ignored offer may be presented again while the user remains on the same page, or if they move to another page for which the same offer is active.
The time interval after which the offer is presented again on the same page is configured in the Offers Settings. If the user moves to a new page for which the same offer is active, then it will be presented when it becomes eligible again. -
-
Limit the number of re-offers to: Select this option to limit the number of times you want to re-offer an ignored offer.
-
-
To determine whether an offer is eligible to be re-offered, each physical URL on the site that the user visits is considered to be a new page, even if more than one URL corresponds to the same Web Page object within the Offers Console. If an offer is set to not re-offer after being accepted/rejected/ignored, this applies for the duration of the user’s current session on the site. If the same user returns to the site at a later time, the later visit will be considered a new session and any offer can be presented when it becomes eligible.
-
-
Do not count towards Maximum number of offers per visit: Select this option if you wish for this offer to be excluded from the maximum number of offers allowed per visit, which is configured in the Offers Settings.
-
Move visitor to front of chat queue upon accept (Chat Automatic Only): Select this option if you wish to give visitors queue priority upon accepting the offer. Visitors that accept this offer are filtered into a priority list that places them at the front of the queue.
-
-
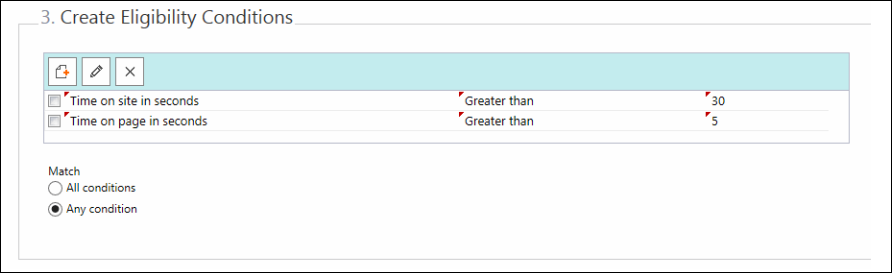
In the Create Eligibility Conditions section, do the following:
-
Click the Add
 button.
 -
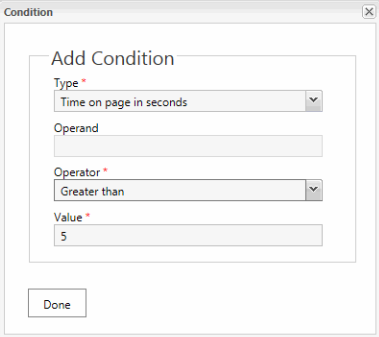
In the Condition window, set the following:
-
-
-
-
Type: Set the condition type, which dictates how the offer becomes eligible under time, screen space, device, or user conditions. Select from - Time on site in seconds, Time on page in seconds, Time on field in seconds, Value of field, Referrer URL, Value of expression, User Agent, Device type, Screen width, and Screen Height.
-
Operand: Specify the field or expression within the page that must be considered. Provide the ID of the field from the HTML source on the web page for which you are creating this condition. For example: <form id="quick-search">. This is only enabled for Time on field, Value of field, and Value of expression types of conditions.
-
Operator: Select from - Equal to, Greater than, Greater than or equal to, Less than, Less than or equal to, Not equal to, Does not contain, Contains, Matches, Begins with, and Ends with.
-
Value: Set the value for the condition. For example, for value of field, specify the value the condition should check for, and for time on page, specify the time that will qualify the customer for an offer. The time value is set in seconds.
-
-
Click the Close button. To delete an eligibility condition, select the condition and click the Delete  button. To edit one, select the condition and click the Edit
  button.
-
-
Specify if an offer will qualify for presentation when all the conditions are met or if any one of the conditions are met.
-
-
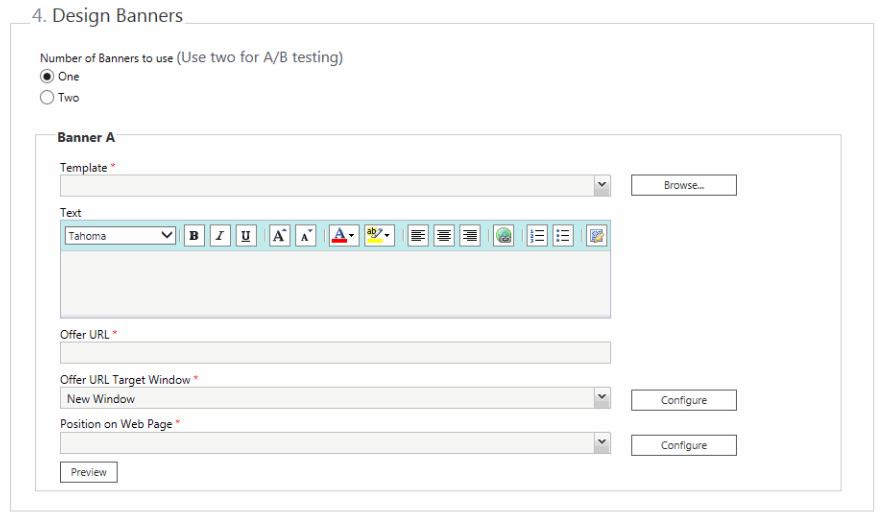
In the Design Banners section, do the following:
-
-
Number of Banners to Use: Select One. The option of configuring two banners must be used only for A/B testing.
-
Template: From the dropdown list, select a template. To see how the templates look, click the Browse button. To see more about creating your own templates, see Creating Templates. If you know the name of the template you want, type the name in the Filter field to reduce the number of results and quickly go to your selected template. Clear the Filter field to see all the templates.
-
Text: Type the text to be presented on the offer window. Use the text editor tools to format the text.
-
Offer URL: Provide the URL that the offer should point to. For example, for a Marketing Content offer, the link to a whitepaper page, or the link to an entry point configured for text chat, one way video chat, or two way video chat in a chat offer can be used. You should have configured these URLs while preparing the content for offers.
-
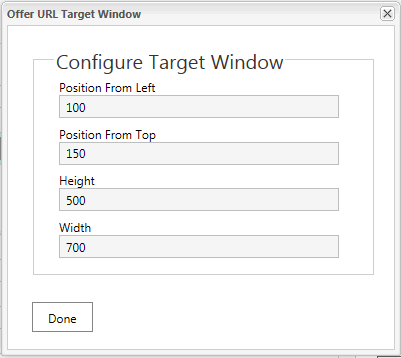
Offer URL Target Window: Specify if the offer URL should open in a new window, in a docked window that floats on top, or in the same window where the offer is presented. For offer URLs that open in a new window, you can also configure the following properties of the new window. Click the Configure button.
-
The docked URL target window is used for docked chat interactions.
In the Offer URL Target window, set the following properties for the target window. All values are in pixels.
-
-
-
Position from Left: Position of the offer URL target window from the left of the screen.
-
Position from Top: Position of the offer URL target window from the top of the screen.
-
Height: Height of the offer URL target window.
-
Width: Width of the offer URL target window.
-
-
-
-
Position on Web Page: Select a style for presenting the offer. The options available are:
-
-
Bottom Left
-
Bottom Right
-
Center
-
Top Left
-
Top Right
-
Relative
-
-
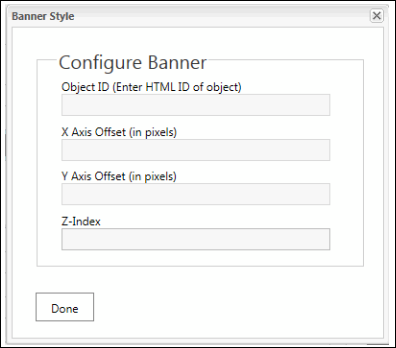
Click the Configure button next to the Position on Web Page field to configure additional properties.
In the Banner Style window, set the following.
-
-
Z-Index: This defines the stack order of the elements. Set this property to create overlapping elements. The greater the number, the higher the priority. For instance, an element with the value of 2 will display in front of an element with a value of 1. A negative number can be used to hide the element.
-
The following three options are available only for relative offers:
-
-
Object ID: Provide the HTML ID of the object relative to which the offer is placed.
-
X Axis Offset: Define in pixels the placement of the relative offer from the top of the screen.
-
Y Axis Offset: Define in pixels the placement of the relative offer from the left of the screen.
-
Click the Preview link to see what the offer will look like.
-
Click the Save button.
-
The page is refreshed and you see the option to associate pages with the offer. See Assigning Offers to Pages.