Configuring Secure Message Center
To configure the secure message center:
-
From the Partition and Departments dropdown menu, select a department.
-
From the Navigation menu, browse to Apps > Secure Messaging> Secure Messaging Center.
-
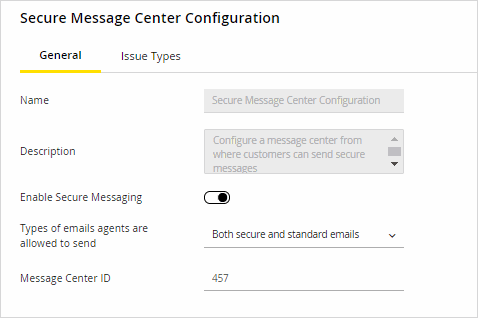
On the Properties page, on the General tab, provide the necessary information:
-
Name: This is automatically provided and cannot be changed.
-
Description: This is automatically provided and cannot be changed.
-
Enable secure messaging: Click the Toggle button to enable.
-
Types of emails agents are allowed to send: Select one of the following options.
-
Both secure and standard messages: Select this to allow agents to work on both standard and secure email activities. For more information, see Secure Message Center.
-
Only secure emails: Select this to allow agents to only compose secure emails and send secure replies. With this setting enabled, agents cannot respond to emails sent through the standard email alias and workflow. This setting applies to all agents in the department.
-
-
Message Center ID: The Message Center ID is primarily used in APIs and the message center URLs. This value is automatically provided. The ID length must be at least 3 characters long and cannot exceed 15 characters.

-
-
On the Properties page, on the Issue Types tab, click the Add
 button to add any desired issue types that have been created. Issue types that have been added will appear under the Name column.
Secure message centers do not require issue types or subjects to function. For more details on creating issue types, see Creating Issue Types.
-
Click the Save button.
Related Topics