Configuring Secure Message Notifications
Secure message centers can be equipped with notifications, which are sent to the customer’s personal email address, informing them of new messages in their secure inbox. Notification messages are authored in the KB Console. Notification articles must be published and available before configuring them for secure message centers.
Notifications configured in Secure Messaging require that an alias be configured for outbound emails. For more details about aliases, see About Aliases.
Notifications configured in Secure Messaging operate independently from notifications in workflows. Thus, the following is recommended when setting up notifications for secure messaging:
-
Configure the modify object node in workflows to send a notification. For more information about workflows, see Configuring Modify Object Node.
OR
-
Configure notifications under the Secure Messaging node in the tree pane.
Configuring both notification methods for secure messaging is not recommended.
To configure secure message notifications:
-
From the Partition and Departments dropdown menu, select a department.
-
From the Navigation menu, browse to Apps > Secure Messaging> Notification.
-
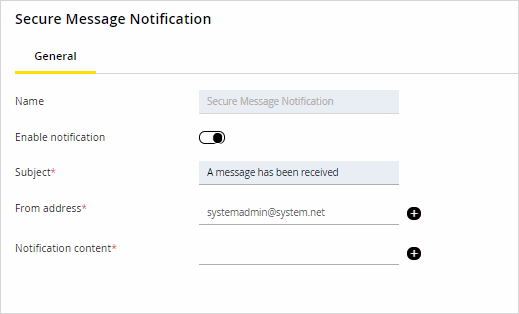
On the Properties page, on the General tab, provide the following:
-
Name: This value is provided and cannot be changed.
-
Enable notification: Click the Toggle button to enable or disable notifications.
-
Subject: The subject line that will appear in the customer’s primary inbox for the notification email.
-
From address: Click the Add button and select one of the following options.
-
Select an alias: Select an alias from the dropdown menu of the available aliases configured for the department.
-
Use the following email address: Provide the email address in the From address field, which will appear in the customer’s inbox. In the Send as field, provide the name that will identify as the sender of the email, which will appear in the customer’s inbox when the notification arrives.
-
-
Notification content: Click the Add
 button. In the window that appears, select the appropriate notification article from the list of knowledge base folders and click Okay.

-
-
Click the Save button.
Related Topics