Using the Resource Manager Tool
About the Resource Manager Tool
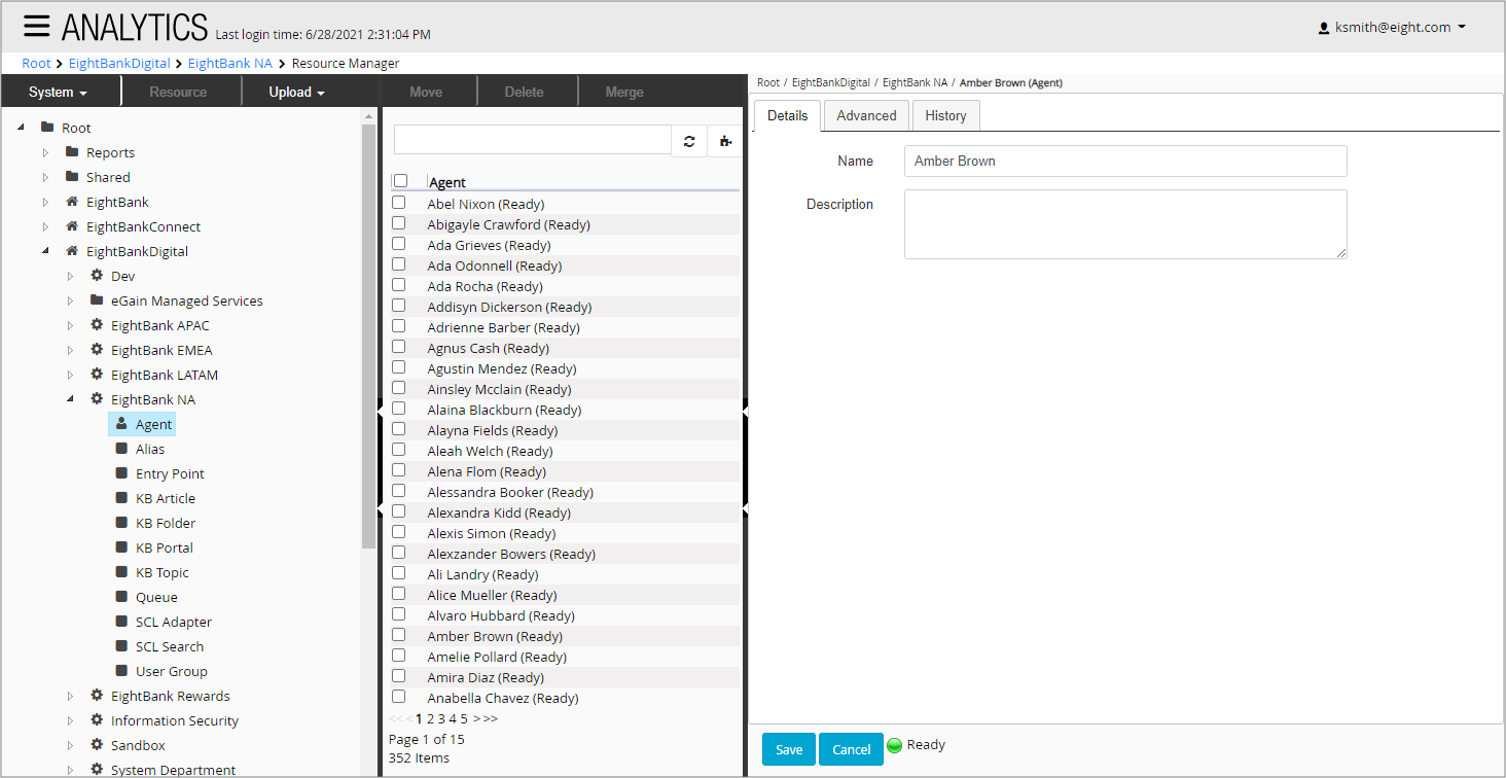
The Resource Manager Tool (sometimes referred to as Classic or Legacy Resource Manager) is the quickest method to manage resources although it takes up the full screen and cannot be embedded in a dashboard, unlike the Resource Manager Gadget. The tool displays resources in a 3-panel layout:
-
The Folder Tree panel (on the left) allows you to navigate the folder hierarchy and the resource types within each folder.
-
The Items panel (in the middle) lists items within the selected folder/resource type.
-
The Details panel (on the right) displays the properties for item that is selected in the Items panel. Until an item has been selected, this panel shows a message with some tips on how to use the tool.

The Folder Tree panel behaves in much the same way as in other Analytics tools except that it expands to show an additional level, listing the resource types within each folder. These appear as if they are sub-folders but are denoted by different icons than actual sub-folders:
-
Agent or User
-
Group
-
Parameter Set
-
Other resource type
Resource types are listed alphabetically. If the selected folder contains both resources and sub-folders, then the Folder Tree panel lists all sub-folders first (alphabetically amongst themselves) and all resource types second (also alphabetically amongst themselves).
The right edges of the Folder Tree panel and Items panel each have a ‘handle’ in the middle that you can click on to minimize those panels to make more room for the Details panel. Click on the ‘handle’ of a minimized panel again in order to re-open it.
In order to use the Resource Management tool, you need to have permission to manage resources as well as permission to access the tool itself. Typically, you have sufficient permissions providing that you belong to the Advanced Users default group in the folder in which the resources are located. You must also be using Advanced Mode.
Browsing Resources
To browse resources in your folder hierarchy:
-
Open the Tools
 menu.
menu. -
Select Provisioning > Resource Manager.
-
Navigate to a folder in the Folder Tree panel.
-
There are two ways to see which resource types are located in a given folder:
-
Click on the folder in the Folder Tree panel. The Items panel lists the resource types and count the number of resources of each type.
-
Expand the folder in the Folder Tree panel. The panel displays the resource types as a sub-level of the hierarchy.
-
-
Select a resource type (such as Agent) in either the Folder Tree panel or the Items panel. The Items panel shows a list of the resources of the selected type in the selected folder.
-
Items are listed alphabetically by name.
-
Optionally type a phrase into the search box and click Search to filter the list to items with a matching name.
-
If the list of items spans multiple pages then you can use the pagination controls at the base of the list to navigate through the pages.
-
-
In the Items panel, find a resource you wish to view and click its name. The properties of the selected resource appear in the Details panel.
-
Depending on the resource type, you may be able to edit its properties. Click Save to save any changes or click Cancel to discard any changes without saving.
Moving Resources
To move resources from one folder to another:
-
Open the Tools
 menu.
menu. -
Select Provisioning > Resource Manager.
-
Navigate to the folder where the resources are located using the Folder Tree panel.
-
Select the correct resource type either by clicking on it in the Items panel or by expanding the Folder Tree panel to show resource types and clicking it there.
-
In the Items Panel, find the resources you wish to move and check the box next to each one. If you navigate across pages, your selection within each page is retained.
-
In the Items Panel toolbar, click Move. The folder selection screen appears.
-
Select a folder in the tree as a destination for the selected groups. This must be another folder for which you have Resource Management permissions.
-
Click Save to commit the move, or click Back to cancel the move.
Deleting Resources
You can delete Analytics-specific resources (for example, users, groups, reports, parameter sets). Cisco users may also have permission to delete imported Cisco resources.
To delete resources:
-
Open the Tools
 menu.
menu. -
Select Provisioning > Resource Manager.
-
Navigate to the folder where the resources are located using the Folder Tree panel.
-
Select the correct resource type either by clicking on it in the Items panel or by expanding the Folder Tree panel to show resource types and clicking on it there.
-
In the Items Panel, find the resources you wish to delete and check the box next to each one. If you navigate across pages, your selection within each page is retained.
-
In the Items Panel toolbar, click Delete.
-
Confirm the deletion in the prompt.
Related Information