Creating an Orchestration Job
A Knowledge Orchestration job processes your transcript or query data through the full Knowledge Orchestration pipeline: ingestion, embedding, clustering, topic hierarchy generation, and instant answer generation. You can also create a job that imports a project bundle exported from eGain WYCA.
To create an orchestration job:
- In the Navigation Menu, browse to Knowledge Orchestration.
- Select + Create Job in the upper right of the dashboard.
- In the Create Job dialog, under What type of job would you like to create?, select the option that matches where your source data resides:
- Upload Files: Import transcripts from JSON files or a ZIP archive.
- S3/Server Path: Import transcripts from an S3 URI or server path.
- Keywords & Queries: Import a list of keywords or search queries.
- Analytics: Import failed search strings from analytics.
- Import Project: Import a Knowledge Orchestration project bundle ZIP into this department. For more information, see Importing a WYCA Project.
The dialog title changes to show the selected job type (for example, Create Job - Upload Files). To choose a different job type, select Back to Options.
- Provide the source data for the selected job type:
-
Upload Files: Drag and drop your file into the upload area, or select Select File to browse for it. The selected file appears with its name and size. Select X to remove it.
- Supported formats are JSON files or a ZIP archive of JSON files, with a maximum of 10,000 JSON files at 40 KB per file.
- From the Source format dropdown, select the vendor format of your source data. For more information, see Source format options.
- Optionally, select Validate Sample to check which source format the file matches before you start the job. For more information, see Validating a Sample Transcript.
-
S3/Server Path: Enter the full S3 URI or directory path to your JSON files in the S3 URI or path field, for example,
s3://your-bucket/path/to/transcripts/.- Verify that the service account has read access to the specified location before submitting.
- From the Source format dropdown, select the vendor format of your source data. For more information, see Source format options.
- Optionally, select Validate Sample to check which source format the data matches before you start the job. For more information, see Validating a Sample Transcript.
-
Keywords & Queries: Paste your list of keywords or search queries into the Keywords and search queries field. Use this method to audit portal coverage against a known set of terms without requiring transcript data.
Select Sample format at the bottom of the dialog to open the Supported input formats reference. You can paste your keywords or queries in any one of the following formats:
- Plain text: One value per line, for example:
How do I reset my password?
What are your business hours?
Return policy
- Single-column CSV: A header row is optional. For example, export the first column from a spreadsheet keyword list.
- JSON array of strings: The pasted text must start with
[, for example:[ "How do I reset my password?", "What are your business hours?", "Return policy" ]
Limits: Up to 1,000 items, with a maximum of 1,000 characters per item.
- Plain text: One value per line, for example:
-
Analytics: Generate a job directly from portal search analytics instead of uploading transcripts or queries.
- Select a Date range (Last 1 month, Last 3 months, Last 6 months, or Custom) to define the analytics period the job pulls from.
- If you select Custom, enter a Start date and End date.
- The job pulls the portal's search terms along with their successful and failed search counts from analytics, normalizes them using an LLM, and processes them through the Knowledge Orchestration pipeline to identify knowledge gaps based on the selected portal's scope. Use these gaps as the basis for creating new articles.
-
Import Project: See Importing a WYCA Project.
-
- Provide the following information for the job:
- Which Portal Would You Like to Generate Instant Answers For?: Select the portal that the tool should query when auditing answers. Only portals with Use Generative Instant Answer enabled appear in this list. If no portal has this option enabled, the dropdown shows No portals available.
- Language: Select the language of the source content. The dropdown displays all KB primary languages configured for the partition.
- User profile (optional): Select a user profile to personalize the answers that this job generates. The default is None. This option is available for all job types.
- Job Name: Enter a descriptive name for the job.
- Job Description (optional): Add context to help identify the job later.
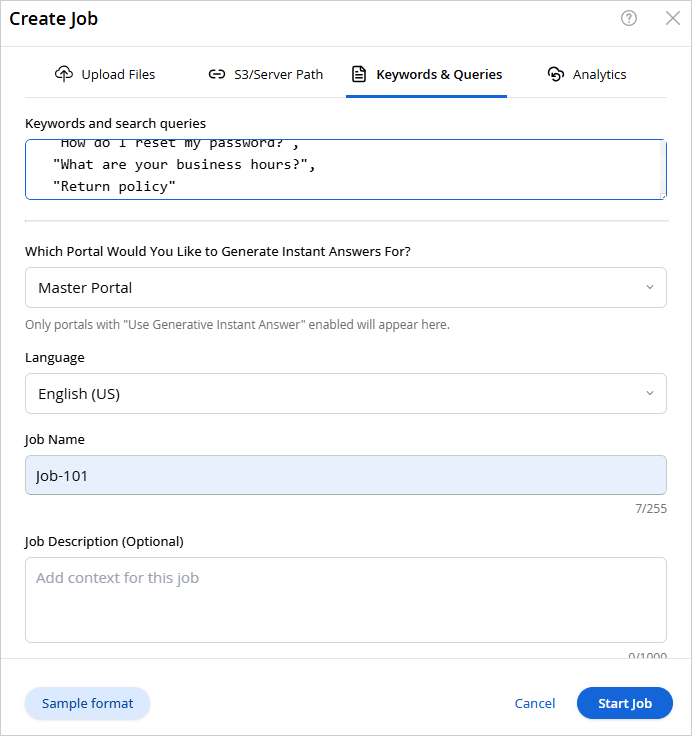
- Select Start Job. The button is available after you provide all required information.
Source Format Options
The Source format dropdown is available for the Upload Files and S3/Server Path job types:
-
Native (Transcript JSON): Use this option for eGain format transcripts.
-
Amazon Connect (Contact Lens)
-
Genesys Cloud
-
Salesforce (LiveChatTranscript)
-
Twilio (Conversation Intelligence)
-
Plain text / WebVTT / SRT / CSV / Infomine
Sample Transcript Format
Select Sample Transcript Format at the bottom of the Upload Files or S3/Server Path dialog to review the expected JSON structure before you submit files. The reference panel provides two views:
-
Schema: Shows the full JSON schema for the transcript file, including the required fields (
filename,channel_type,language,text), their expected data types, and descriptions for each property. -
Sample JSON: Shows a populated example transcript, with values for
filename,ref_id,channel_type,language,intent,created_date, and atextarray containing the individualcallerandagentturns of the conversation.
Ensure your files conform to this structure before submitting. Malformed or incomplete files can cause the job to fail or produce unreliable clustering results.
Validating a Sample Transcript
For Upload Files and S3/Server Path jobs, you can optionally check a sample of your data before you start the job. Validation scores one file or S3 object against the supported source formats and tells you which format it matches and what needs to be corrected. Validation does not start a job, and you can select Start Job without validating.
To validate a sample transcript:
- Select a file, or enter an S3 URI or path. The Validate Sample button appears after you do so.
- Select Validate Sample. The button shows Validating... while the check runs.
- Review the result card. After the check completes, the button changes to Revalidate Sample, which you can select to run the check again, for example, after you change the source format.
The result card shows:
-
Detected format: The source format that the file matches, for example, Detected format: Native (Transcript JSON). If the detected format is different from the format selected in the Source format dropdown, the card displays a note so that you can change the selection before starting the job.
-
The name of the file that was scored. For a ZIP archive, only the first matching file is scored.
-
Required corrections: Issues that you must fix in the file for it to be processed.
-
Warnings: Issues that do not prevent processing but can affect the results.
-
The attributes detected in the file:
-
For Native (Transcript JSON) files: Channel, Language, Intent, Turns, Speaker labels, Reference id, Created date, and Pre-extracted utterances.
-
For other vendor formats: The converter attributes, including the variant, the path of each field, whether the field is required or optional, whether it is present in the file, and what it maps to.
-
If no supported format matches the file, the card shows Format not recognized and lists the required corrections, for example, no supported format matched this file.
To import a Knowledge Orchestration project bundle, use the Import Project job type. A project bundle selected under Upload Files is not recognized as a transcript format.
How the Validated File Is Reused
-
A local file is uploaded once for validation. When you start the job, the job reuses that upload.
-
Removing the file, choosing a new file, or closing the dialog clears the uploaded file. Selecting Back to Options and then selecting Upload Files again keeps it.
-
If you change the file, the S3 URI, the job type, or close the dialog while a check is in progress, the result of that check is discarded.
Importing a WYCA Project
Use the Import Project job type to bring a project that was analyzed in eGain WYCA, together with its generated analysis, into Knowledge Orchestration. The project includes its intents, canonical questions, utterances, and attributes, so that you can continue working with the analysis in Knowledge Orchestration without processing the transcripts again.
You can bring a WYCA project into Knowledge Orchestration in either of the following ways:
-
Export as bundle: Export the project from WYCA as a ZIP file, and then upload it in an Import Project job.
-
See answers in eGain: Send the project from WYCA directly to your eGain instance, and then start the import from the Knowledge Orchestration dashboard.
Importing a project replaces the existing Knowledge Orchestration content in the current department. Your Knowledge Orchestration settings are preserved. You are asked to confirm before the import starts.
Importing an Exported Bundle
- In WYCA, open the project and select Export Project > Export as bundle.
- In the Export dialog, select Include transcript content if you want the conversation messages in the export. Transcript content is not included by default.
- Select Download bundle. The export can take up to 30 seconds for large projects, and the download starts automatically. The bundle is a ZIP file of JSON files, such as
manifest.json,canonical_questions.json,topics.json, andutterances.json. Do not extract or modify the files. - In Knowledge Orchestration, select + Create Job, and then select Import Project.
- Drag and drop the bundle ZIP file into the upload area, or select Select File to browse for it.
- Select the portal to generate instant answers for, the Language, and optionally a User profile.
- Enter a Job Name, and then select Start Job.
Importing a Project Sent from WYCA
- In WYCA, open the project and select Export Project > See answers in eGain, and then complete the steps to connect to your eGain instance.
- In Knowledge Orchestration, a banner at the top of the dashboard shows the project name with a Requires action indicator. Select Import. To discard the project instead, select Cancel.
- The Create Job - Import Project dialog opens with the project. Select the portal to generate instant answers for, the Language, and optionally a User profile.
- Enter a Job Name, and then select Start Job.
Related Topics